> ## Documentation Index
> Fetch the complete documentation index at: https://help.maestra.io/llms.txt
> Use this file to discover all available pages before exploring further.

# How Use Variables to Create a Product Grid Layout for HTML

Imagine a typical everyday task: rendering listed data into a table. Some good examples include order line items, products in a cart, purchase recommendations.

Sometimes the exact quantity of line items is unknown, or it cannot be divided by the quantity of table columns without a remainder.

The ***TableRows*** function can solve this problem by making a layout. It groups the list of values (variables) into rows of X elements each. After that, you can render the table rows and columns in cycles.

***TableRows*** receives the following two variables:

* collection — a list of products;
* number of table columns.

***TableRows*** returns a collection of table rows. Every row has the following properties:

* ***Index***: the index number of the table row (starting with 1);
* ***IsFirst***: whether a given row is the first;
* ***IsLast***: whether a given row is the last;
* ***ValueCount***: the quantity of non-empty cells in the row. For example, if you try to add a list of 8 line items to a 5-column table, the relevant ***ValueCount*** will equal 5 for the first row and 3 for the second one because the second row will have some empty cells.
* ***Cells***: the list of cells in the row\.The number of cells is always equal to the number specified in the ***TableRows*** variable even if there are less values in this variable.Every cell has the following properties:\* ***Index***: the index number of the table column (starting with 1);\* ***IsFirst***: whether the column is the first;\* ***IsLast***:whether the column is the last;\* ***Value***: a relevant list element. This field may be empty.

<Note>
  Please note: The ***Value*** property of a given cell can be empty (null) if the quantity of elements of the ***TableRows*** variable can be divided by the quantity of cells with a remainder only. Therefore you’ll need to check whether this ***Value*** is null if you cannot ensure the appropriate quantity of elements. An email may fail to be sent if there is an empty cell.
</Note>

# Example:

```
`@{ if cell.Value != null } Upload some of the field values: ${ cell.Value.Title } @{ else } Make a layout without using values @{ end if }`
```

Let’s see how it all works by looking at some examples.

# Example 1:

Layout:

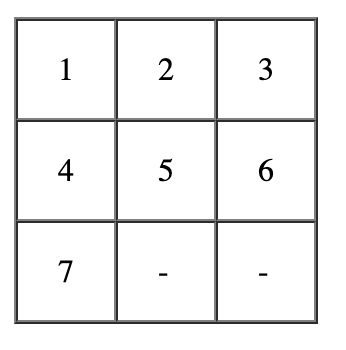
<img src="https://mintcdn.com/maestraio/59KyfifOW7tLz5QR/images/imported/02_gridLayout_png.png?fit=max&auto=format&n=59KyfifOW7tLz5QR&q=85&s=b43f14eeb87d7259da91ee8e46c58c9f" alt="02_gridLayout.png" width="346" height="350" data-path="images/imported/02_gridLayout_png.png" />

A placeholder, e.g. an image, is added to empty cells.
Layout code:

```
`<table>   @{for row in Products, 3)}     <tr>       @{for cell in row.Cells}         <td>           @{if cell.Value != null}             ${cell.Value.Name}           @{end if}         </td>       @{end for}     </tr>   @{end for} </table>`
```

# Example 2:

Layout:

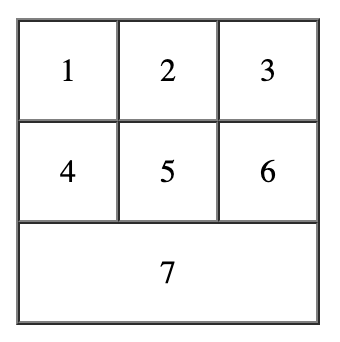
<img src="https://mintcdn.com/maestraio/59KyfifOW7tLz5QR/images/imported/03_gridLayout_png.png?fit=max&auto=format&n=59KyfifOW7tLz5QR&q=85&s=78a390611192cddf3791e9f475d5aa54" alt="03_gridLayout.png" width="340" height="342" data-path="images/imported/03_gridLayout_png.png" />

If there are not enough elements for the last row in the layout, a different layout is applied — e.g., with merged cells.
Layout code:

```
`<table> @{ for row in tableRows(Products, 3) }     @{ if row.ValueCount = 3 }         @{* Layout for a standard row where all the relevant elements are present *}           <tr>             @{ for cell in row.Cells }               <td>                 ${ cell.Value }               </td>             @{ end for }           </tr>         @{ else }           <tr>             <td colspan="3"> 	            @{* Example of a table inside the last row *} 	              <table> 	                <tr> 	                  @{ for cell in row.Cells }                       @{ if cell.Value != null }                         <td>                           ${ cell.Value }                         </td>                       @{ end if }                     @{ end for }                   </tr>                 </table>             </td>           </tr>     @{ end if }    @{ end for }  </table>`
```

# Example 3:

Layout:

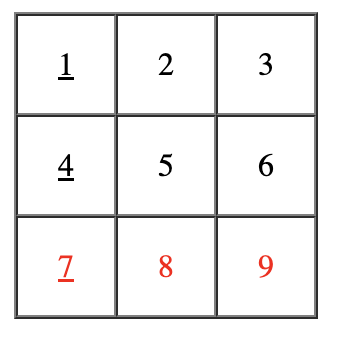
<img src="https://mintcdn.com/maestraio/nXS6QsINTx63g9ke/images/imported/04_gridLayout_png.png?fit=max&auto=format&n=nXS6QsINTx63g9ke&q=85&s=ac22fd161cf09851280a4d819033d30a" alt="04_gridLayout.png" width="338" height="338" data-path="images/imported/04_gridLayout_png.png" />

The last row has a different style and might use a different layout; each starting element in the row has a different style / layout.
Layout code:

```
`<table>   @{ for row in tableRows(Products, 3) }     <tr class="${ if (row.isLast, "red", "regular") }">       @{ for cell in row.Cells }         @{ if cell.Value != null }           <td class="${ if (cell.isFirst, "highlight", "regular") }">             ${ cell.Value }           </td>         @{ end if }       @{ end for }     </tr>   @{ end for } </table>`
```