> ## Documentation Index
> Fetch the complete documentation index at: https://help.maestra.io/llms.txt
> Use this file to discover all available pages before exploring further.
# What is a webhook and how to create one
> Send real-time data from Maestra Platform to any external service the moment something happens to a customer.
A webhook is a small, automated message Maestra fires off to another service the instant something happens — a customer signs up, places an order, hits a loyalty tier, abandons a cart. Instead of the other service constantly asking "anything new yet?", Maestra Platform tells it directly.
## What you can do with webhooks
Notify your helpdesk, warehouse, or any other tool the moment a customer takes an action.
Push customer attributes, order details, or loyalty status to any third-party tool.
Reach Telegram, WhatsApp Business, voice bots, or any service with an API.
Use the webhook's response to branch a flow or personalize the next message.
## How it works
Setting up a webhook in Maestra Platform is a two-part job:
The integration holds everything shared across your webhooks for a given service: the base URL, auth headers, and rate limits.
The webhook defines the specific endpoint, HTTP method, request body, and what to do with the response. You can have many webhooks under one integration.
Think of the integration as the "account connection" and the webhook as an individual "action."
***
# Part 1: Create the integration
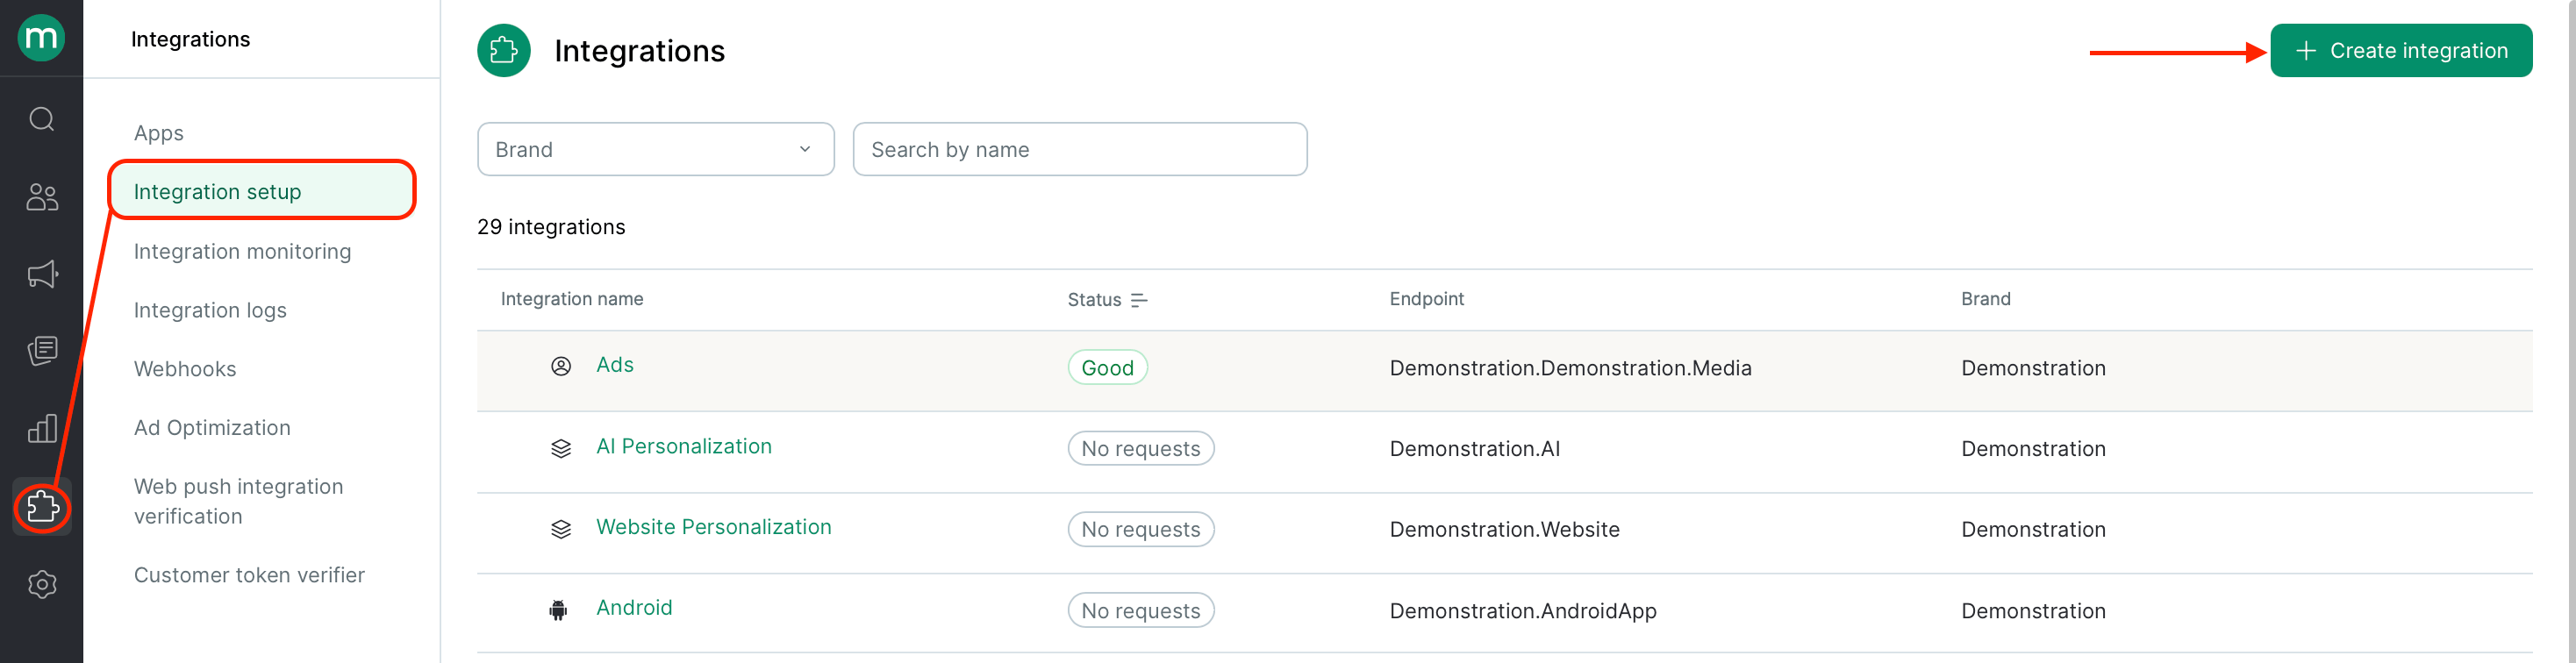
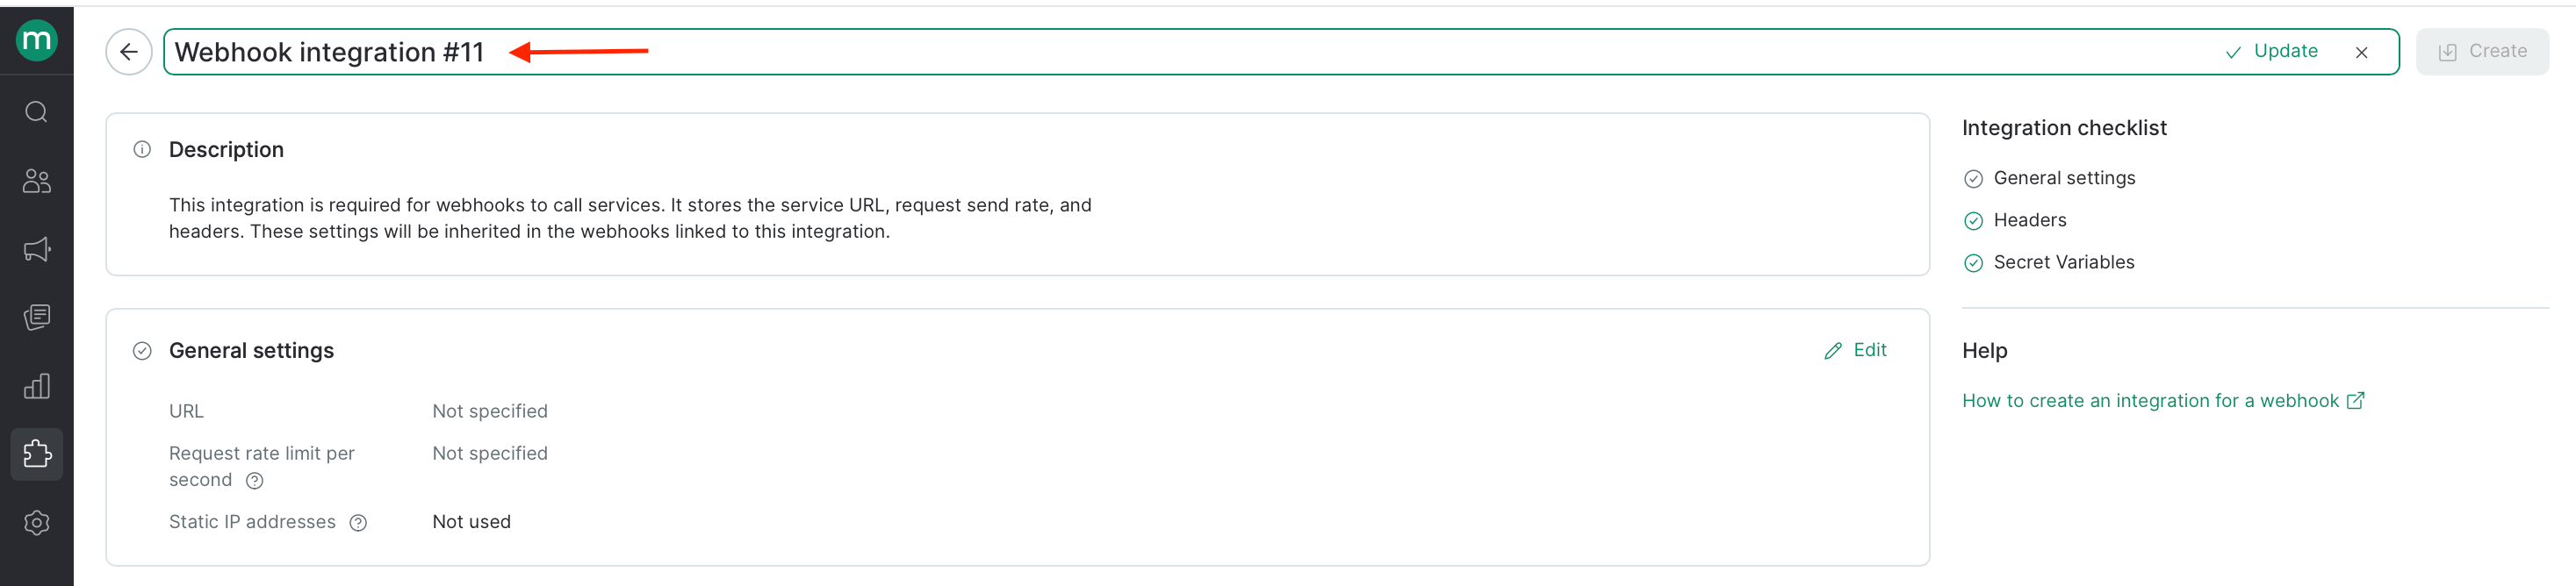
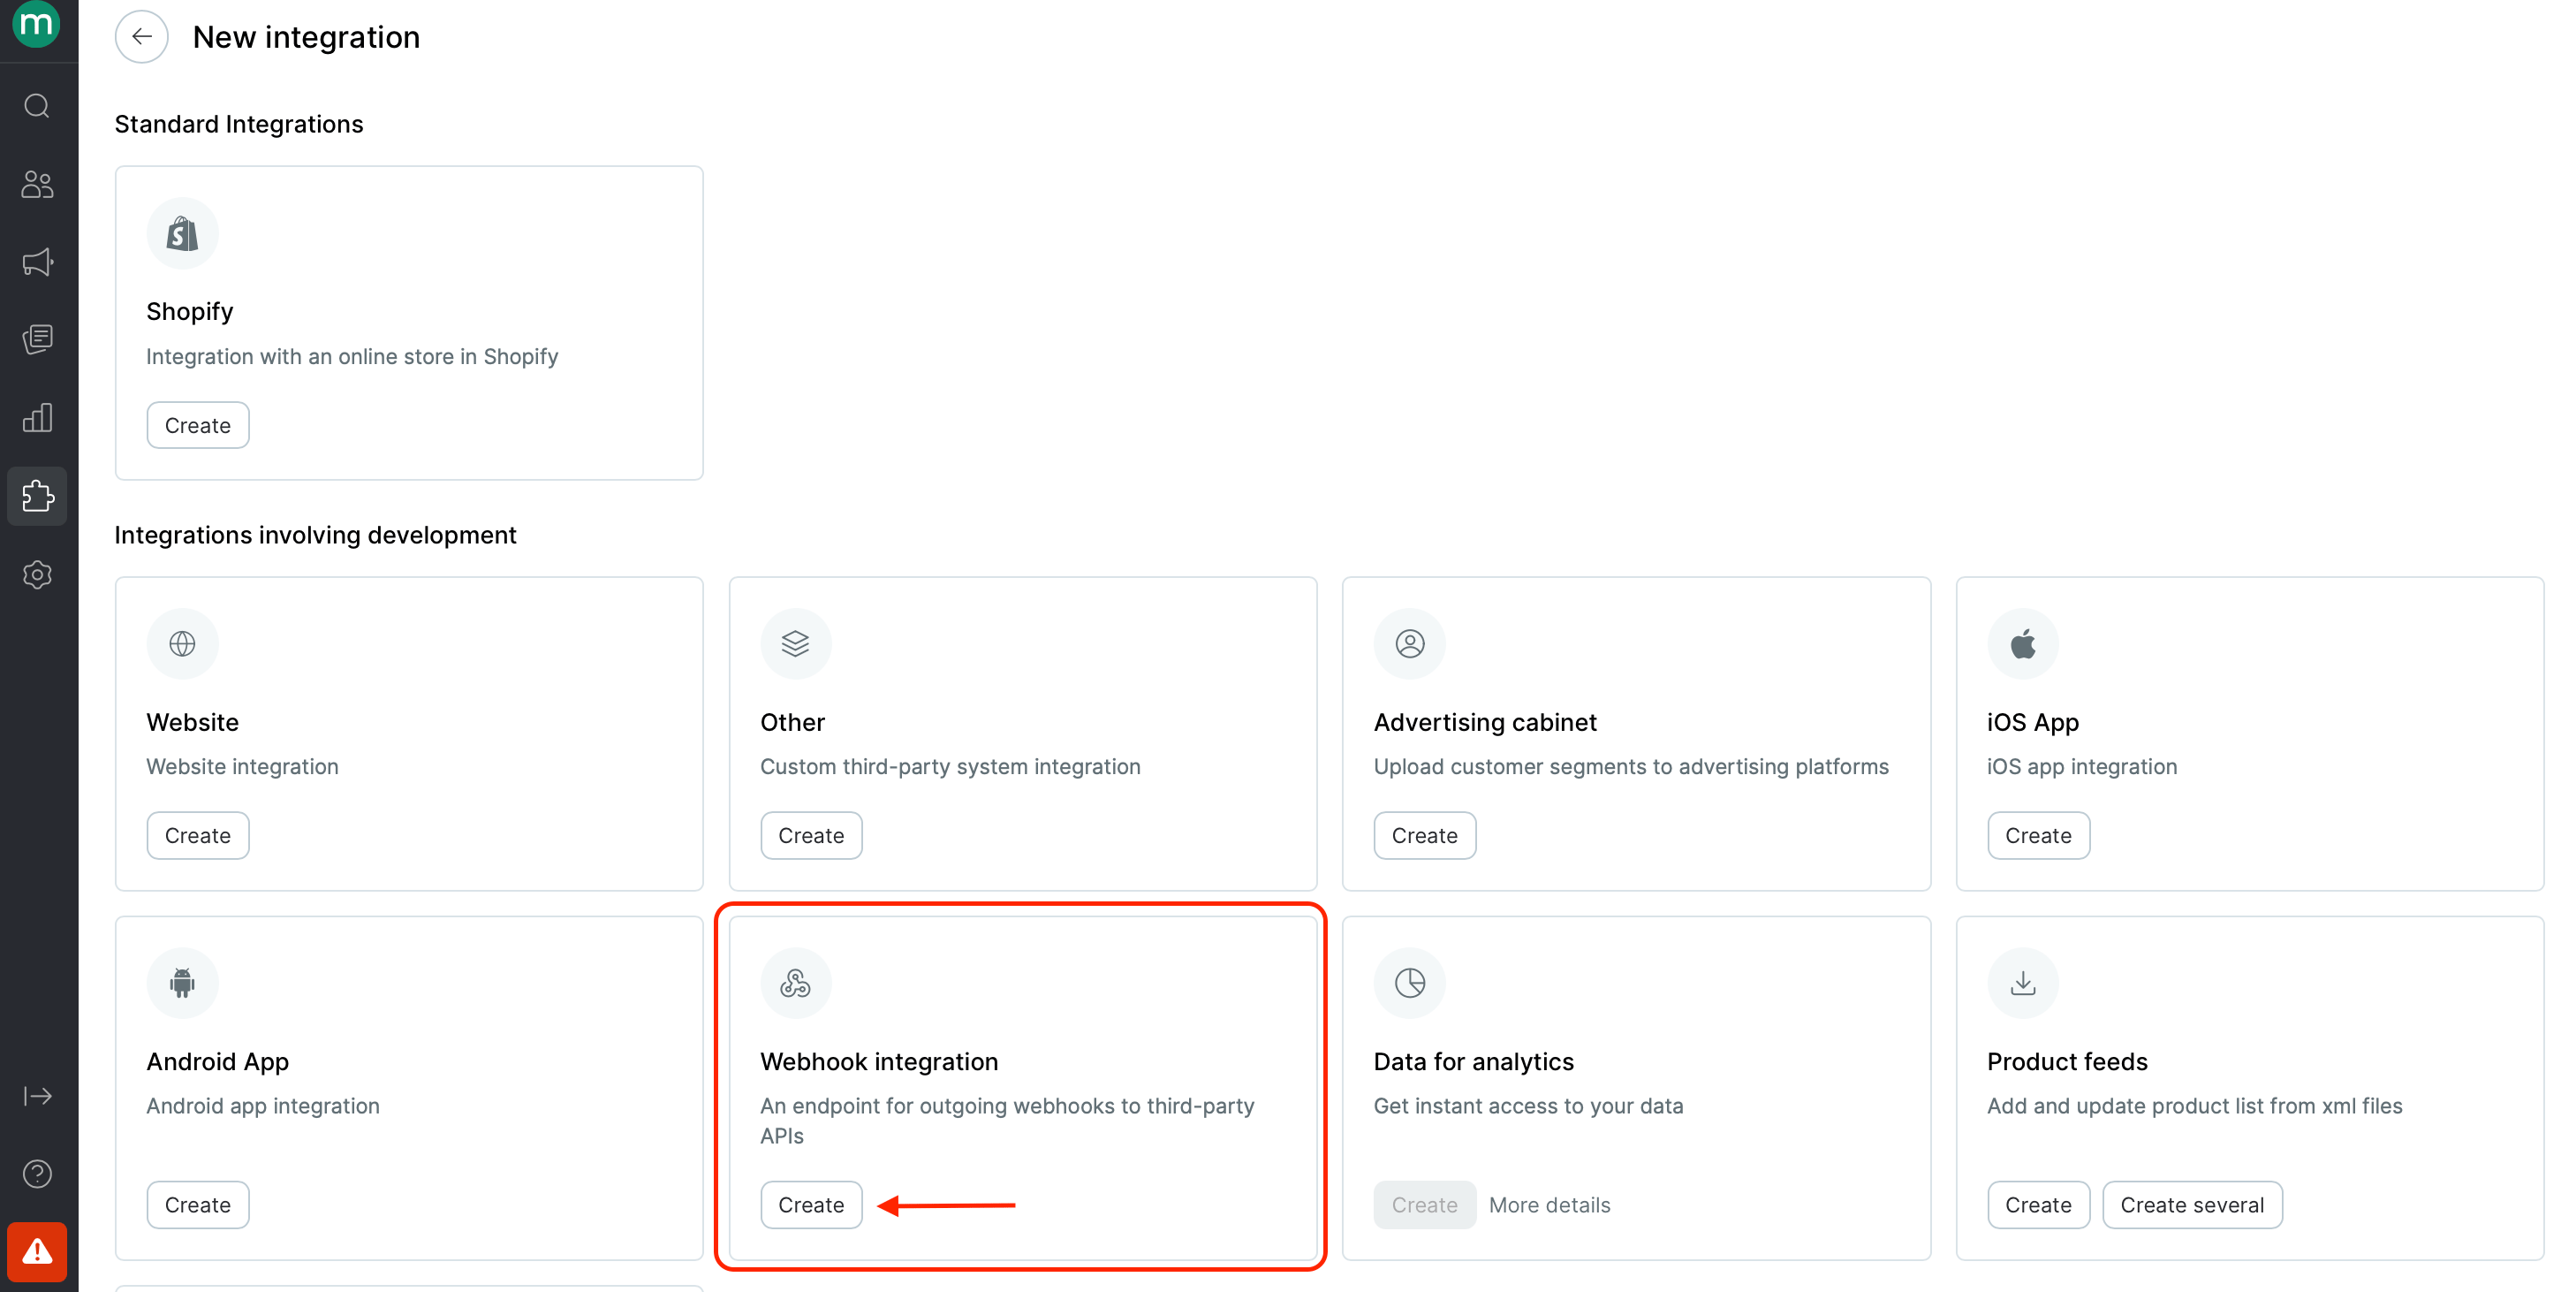 Use a descriptive name so you'll know what it does at a glance — like `Shopify Order Sync` or `Zendesk Ticket Webhooks`.
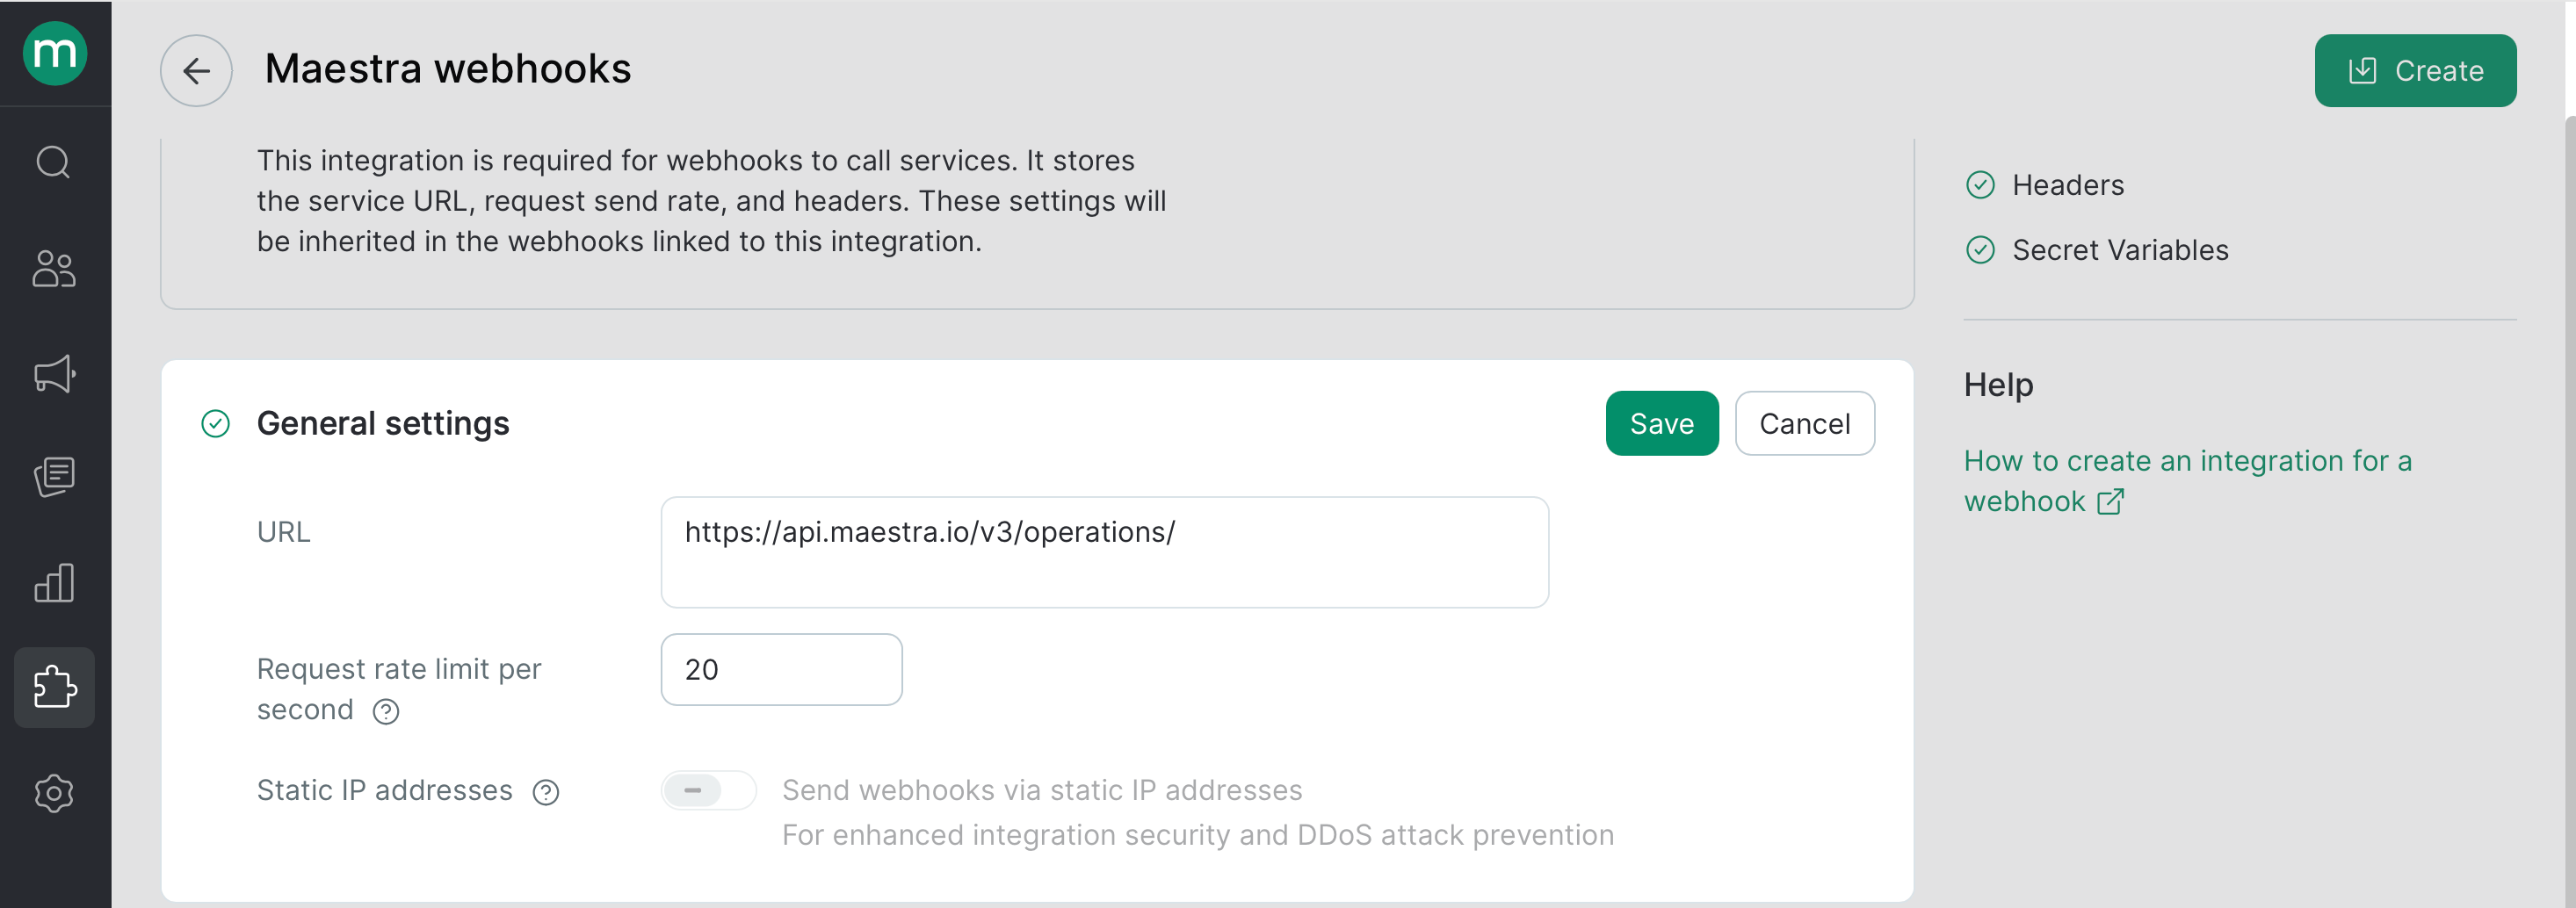
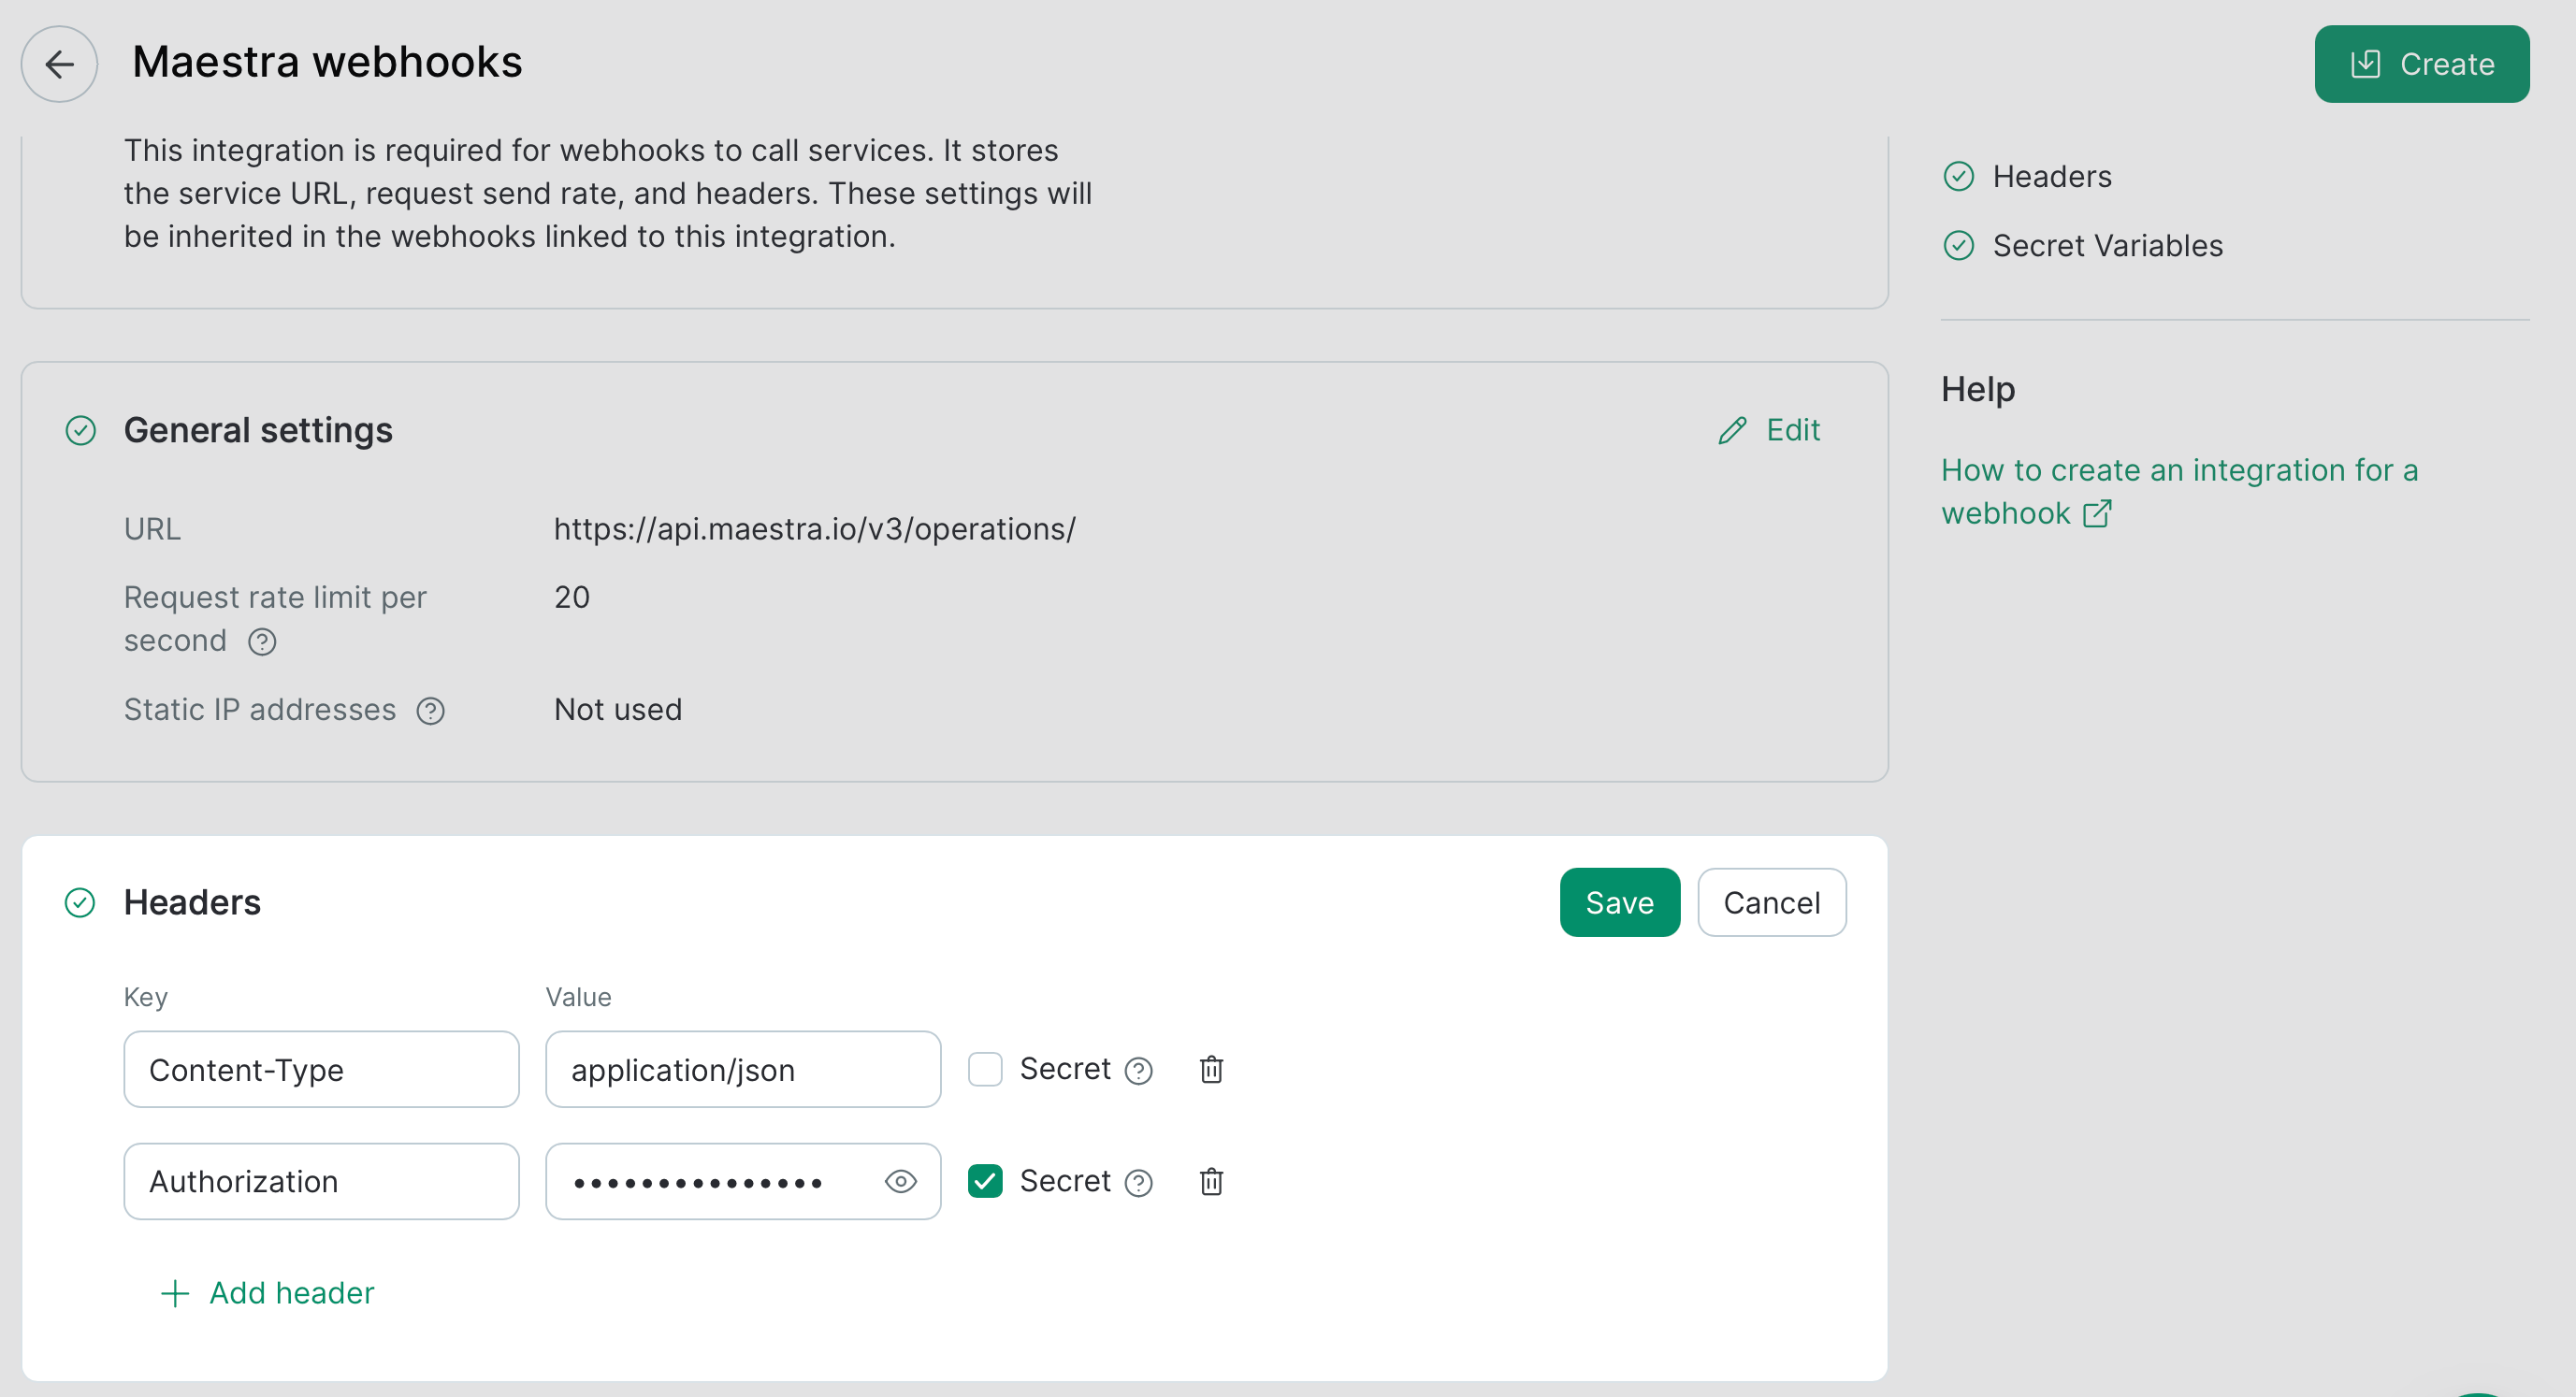
 This is the base URL all webhooks in this integration will share. You can either:
* Put the **full URL** here and leave the path blank on individual webhooks, or
* Put only the **root** here and let each webhook add its own path — the usual setup when one integration covers many different methods. Less typing, fewer typos, and if the base ever changes, you update it in one place instead of touching every webhook.
**Example:** For example, Maestra Platform's own API uses `https://api.maestra.io/v3/operations/` as the root. You set that once on the integration, and each webhook just adds the part that's unique to its method.\\
This is the base URL all webhooks in this integration will share. You can either:
* Put the **full URL** here and leave the path blank on individual webhooks, or
* Put only the **root** here and let each webhook add its own path — the usual setup when one integration covers many different methods. Less typing, fewer typos, and if the base ever changes, you update it in one place instead of touching every webhook.
**Example:** For example, Maestra Platform's own API uses `https://api.maestra.io/v3/operations/` as the root. You set that once on the integration, and each webhook just adds the part that's unique to its method.\\
 If the receiving service has a rate cap, set the max requests per second here. Every webhook in this integration counts toward the same limit.
The actual rate can vary slightly due to network delays. Set the limit a little below what the service can handle to stay safely under the cap.
If the receiving service has a rate cap, set the max requests per second here. Every webhook in this integration counts toward the same limit.
The actual rate can vary slightly due to network delays. Set the limit a little below what the service can handle to stay safely under the cap.
 Add the headers your service needs. The two you'll almost always set are **Authorization** (your API key or token) and **Content-Type** (usually `application/json`).
Mark any header containing a token or secret as **secret**. Teammates without integration access won't be able to see the value when they're building webhooks.
Add the headers your service needs. The two you'll almost always set are **Authorization** (your API key or token) and **Content-Type** (usually `application/json`).
Mark any header containing a token or secret as **secret**. Teammates without integration access won't be able to see the value when they're building webhooks.
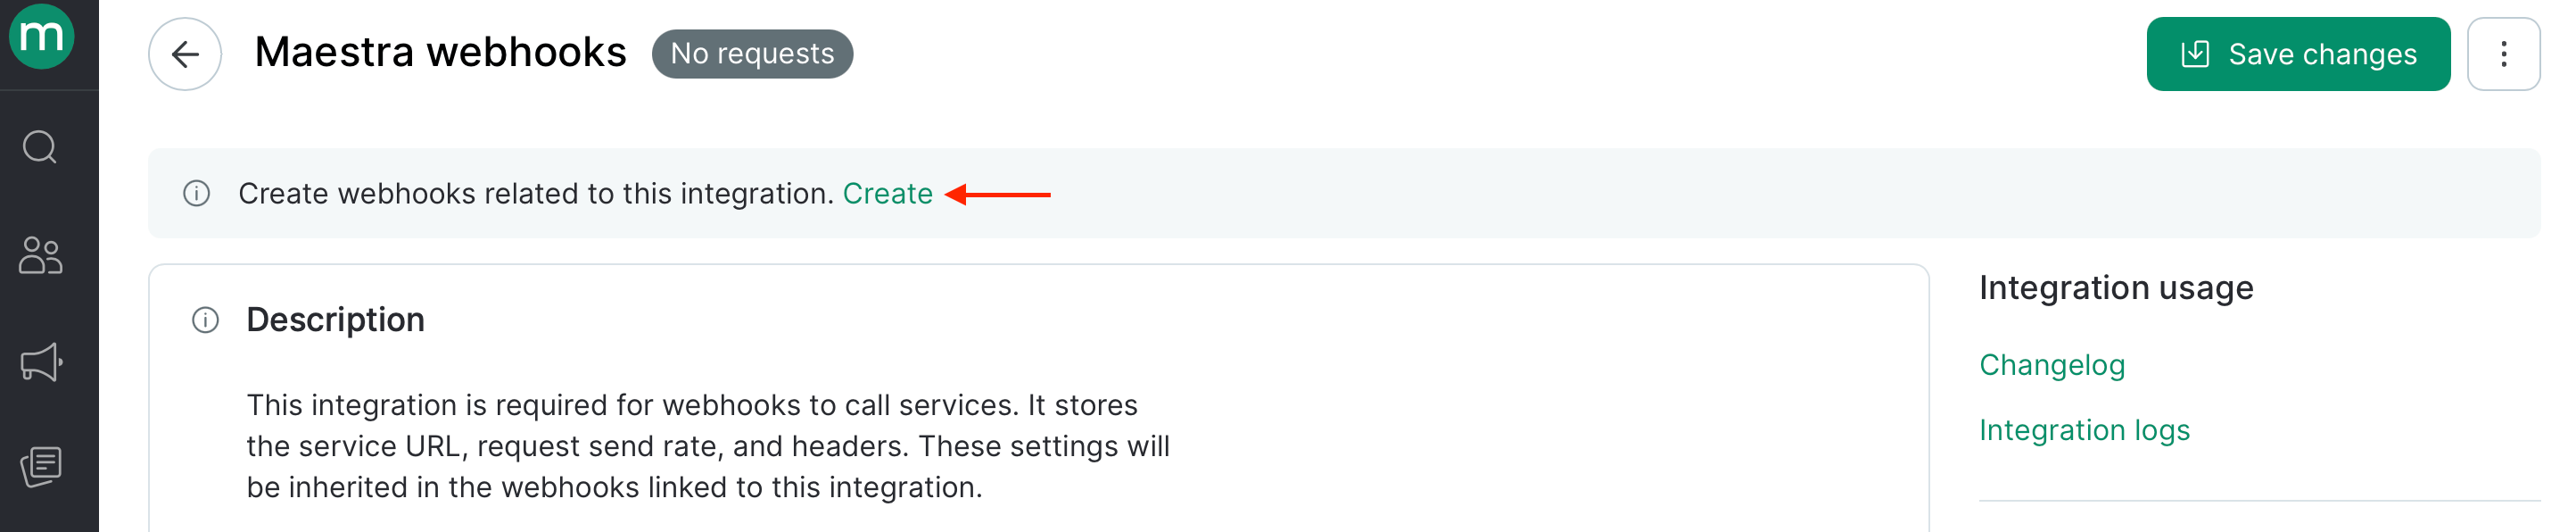
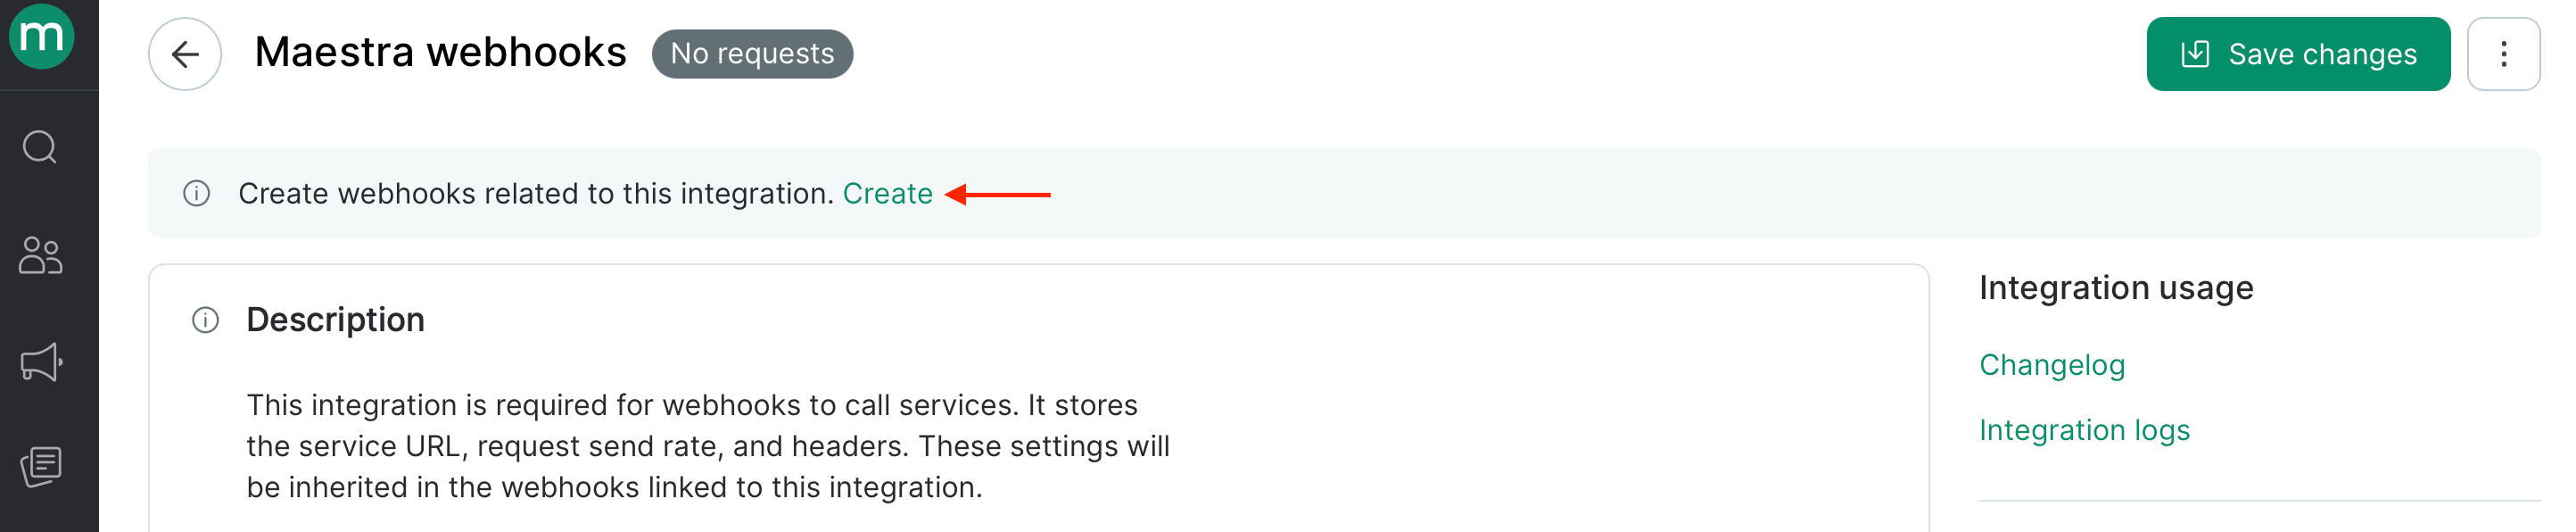
 Your integration is ready. Click **Create** to add your first webhook to it.\\
 ***
# Part 2: Create the webhook
You can create a webhook from one of two places — both end up in the same editor.\\
Continue the setup you started in Part 1 — on the webhook integration page, click **Create**.\\
***
# Part 2: Create the webhook
You can create a webhook from one of two places — both end up in the same editor.\\
Continue the setup you started in Part 1 — on the webhook integration page, click **Create**.\\
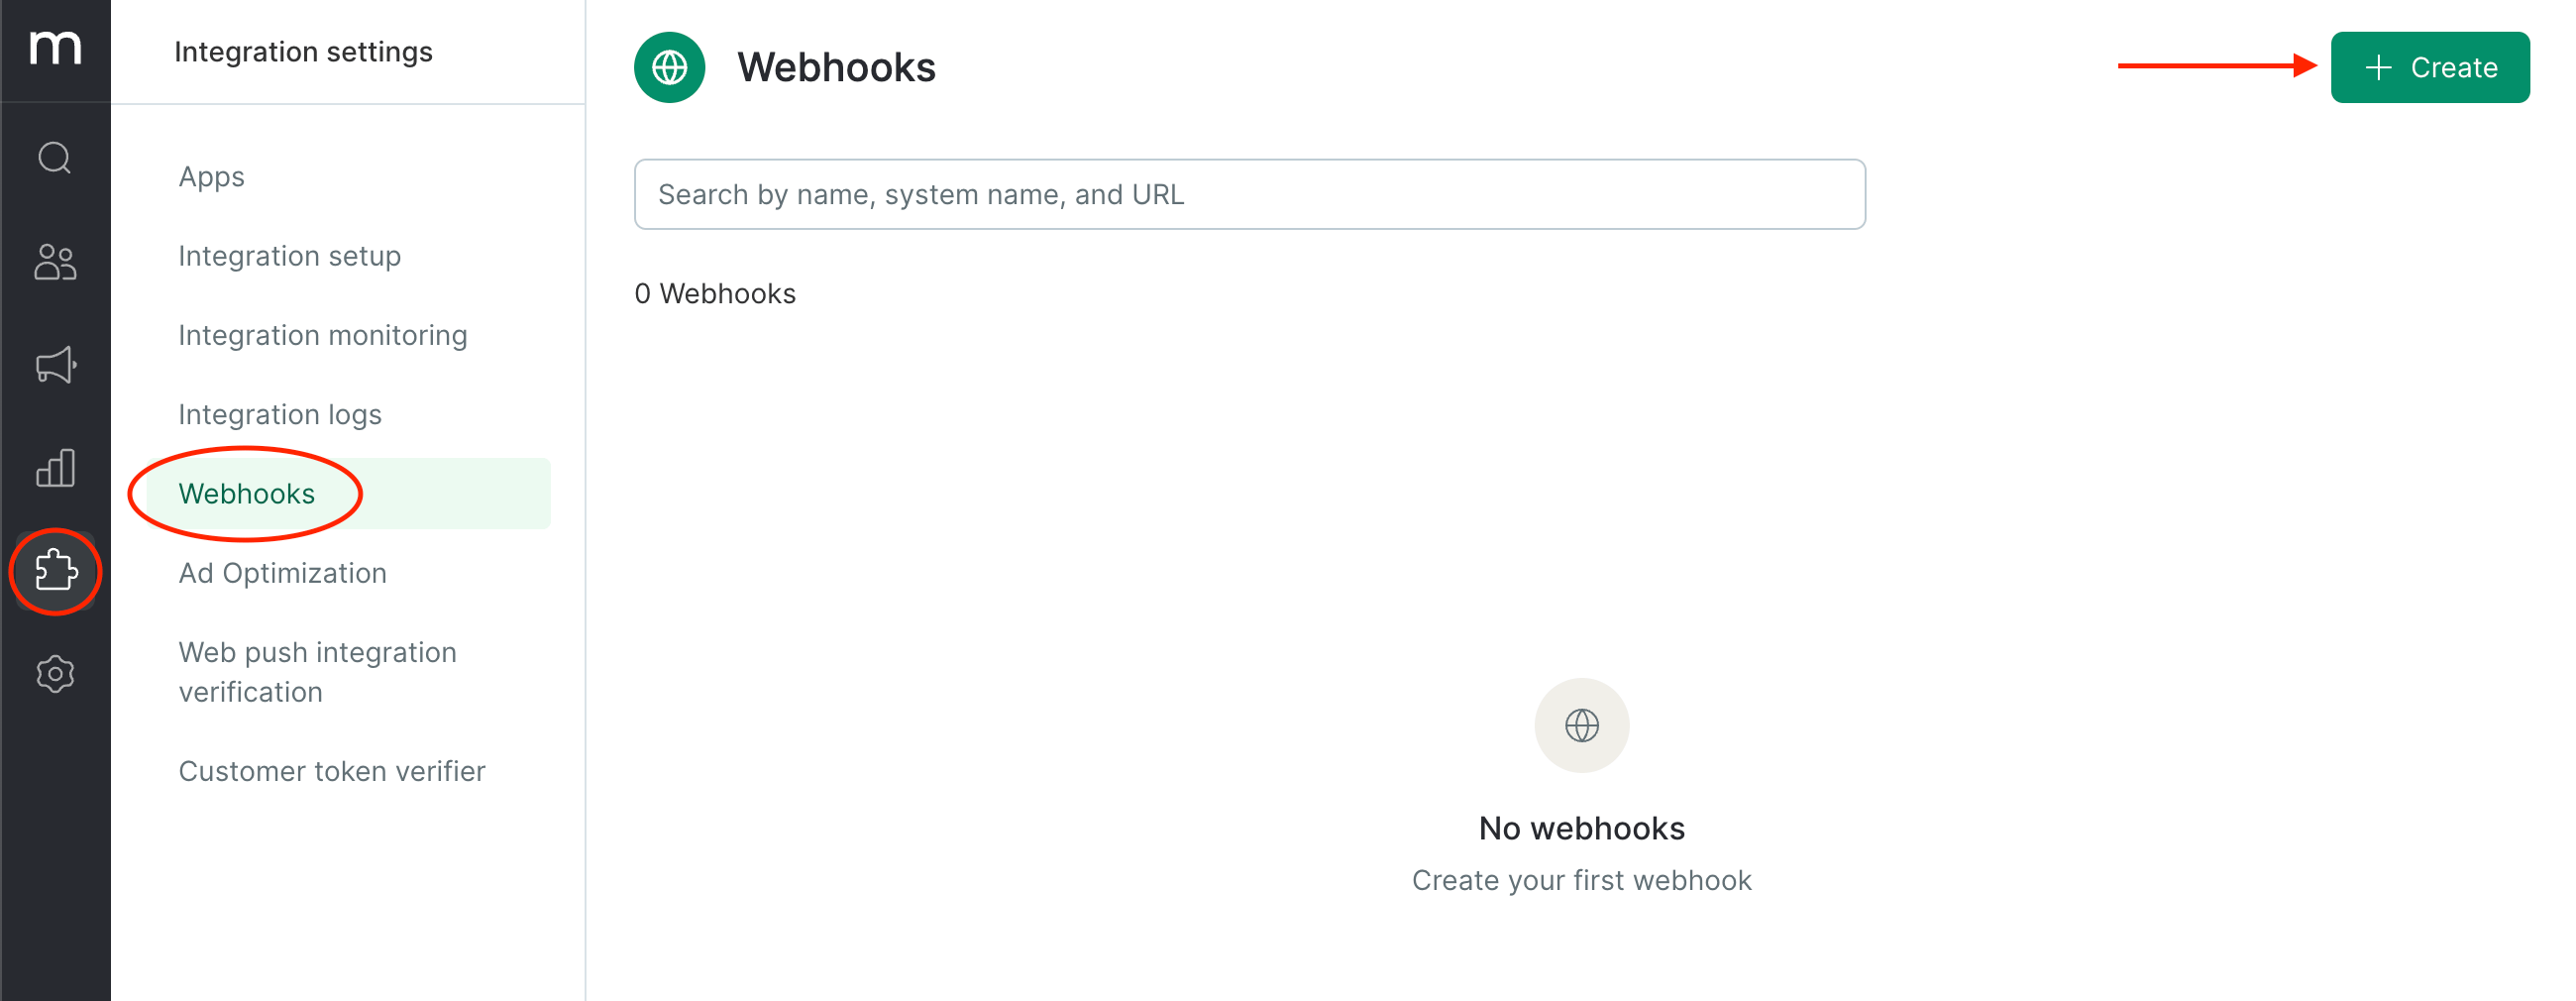
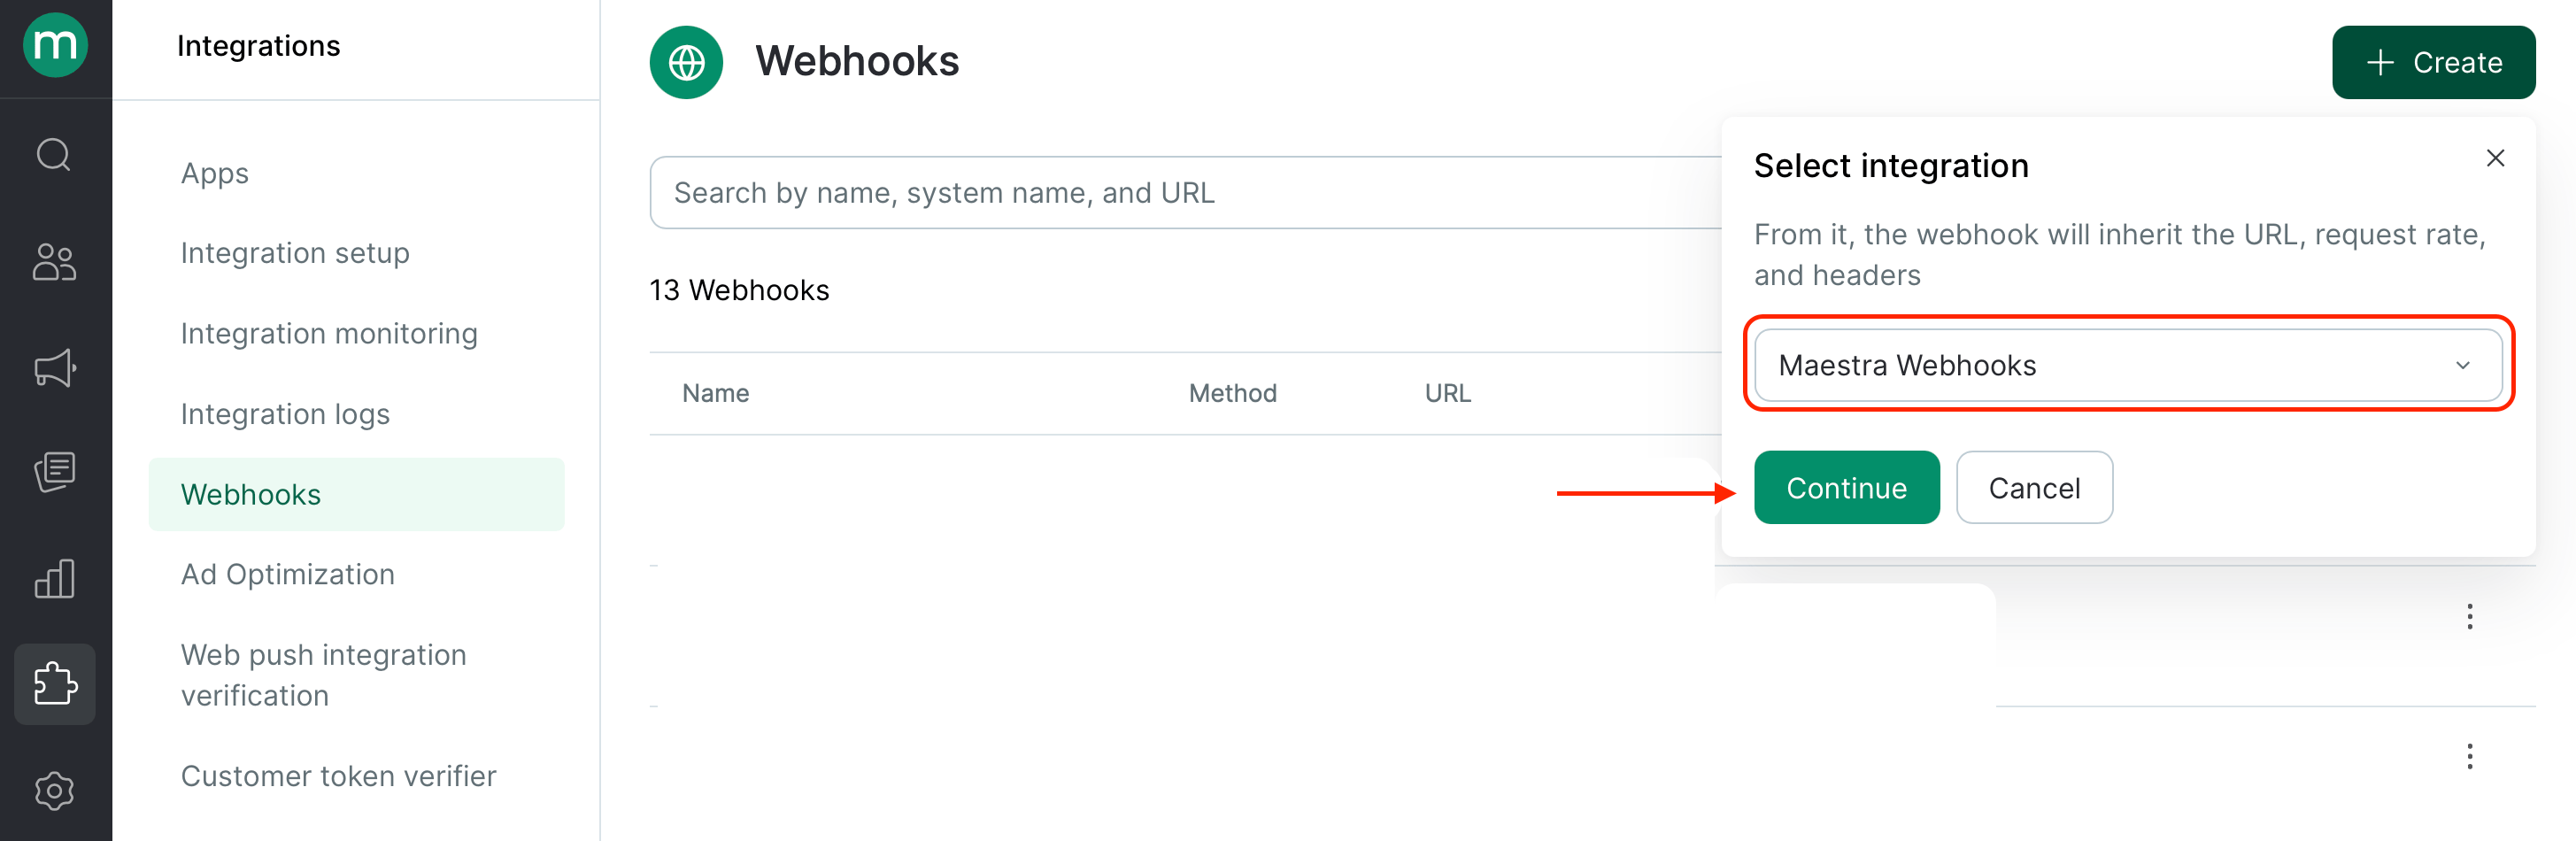
 Go to **Integrations → Webhooks → Create** and pick the integration this webhook belongs to.
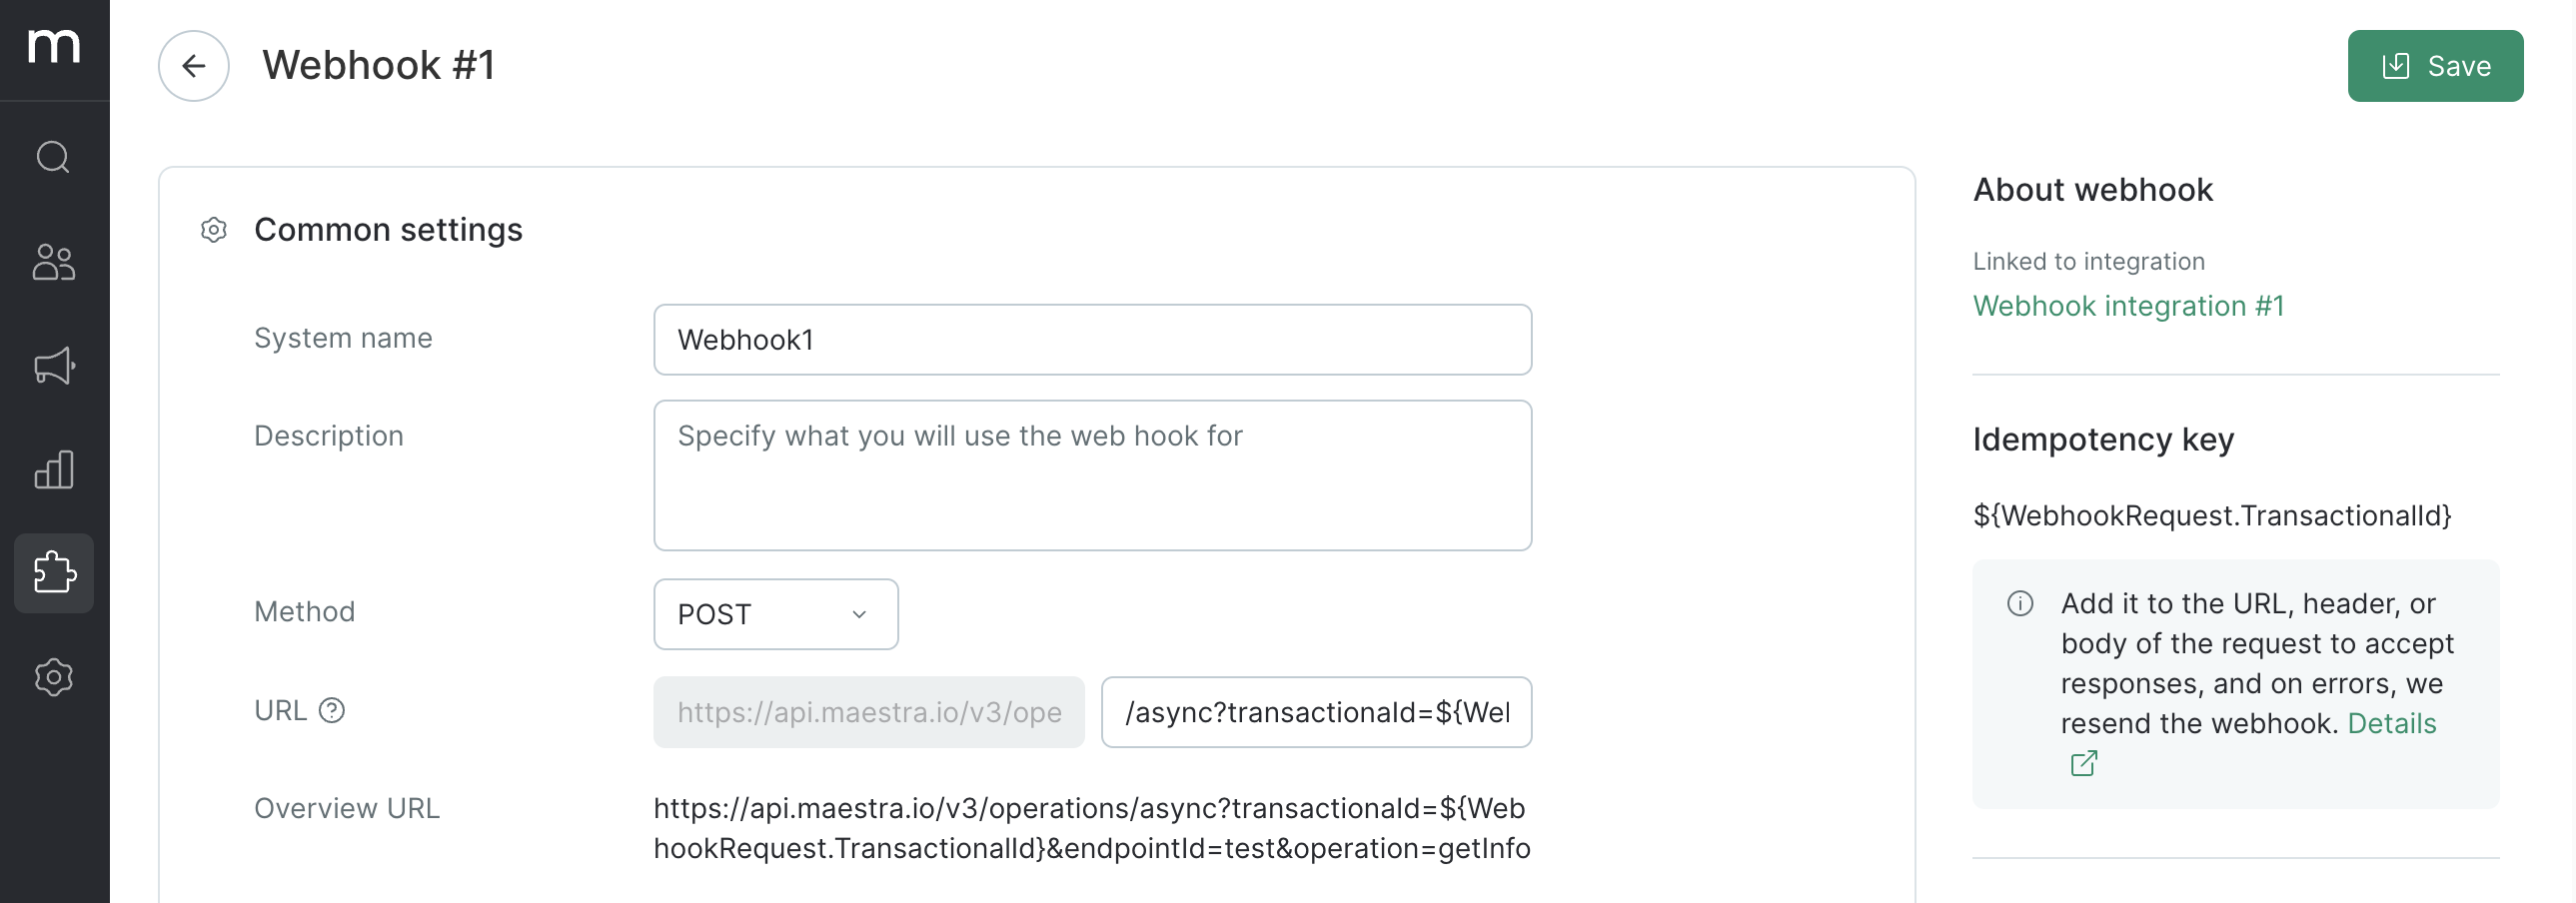
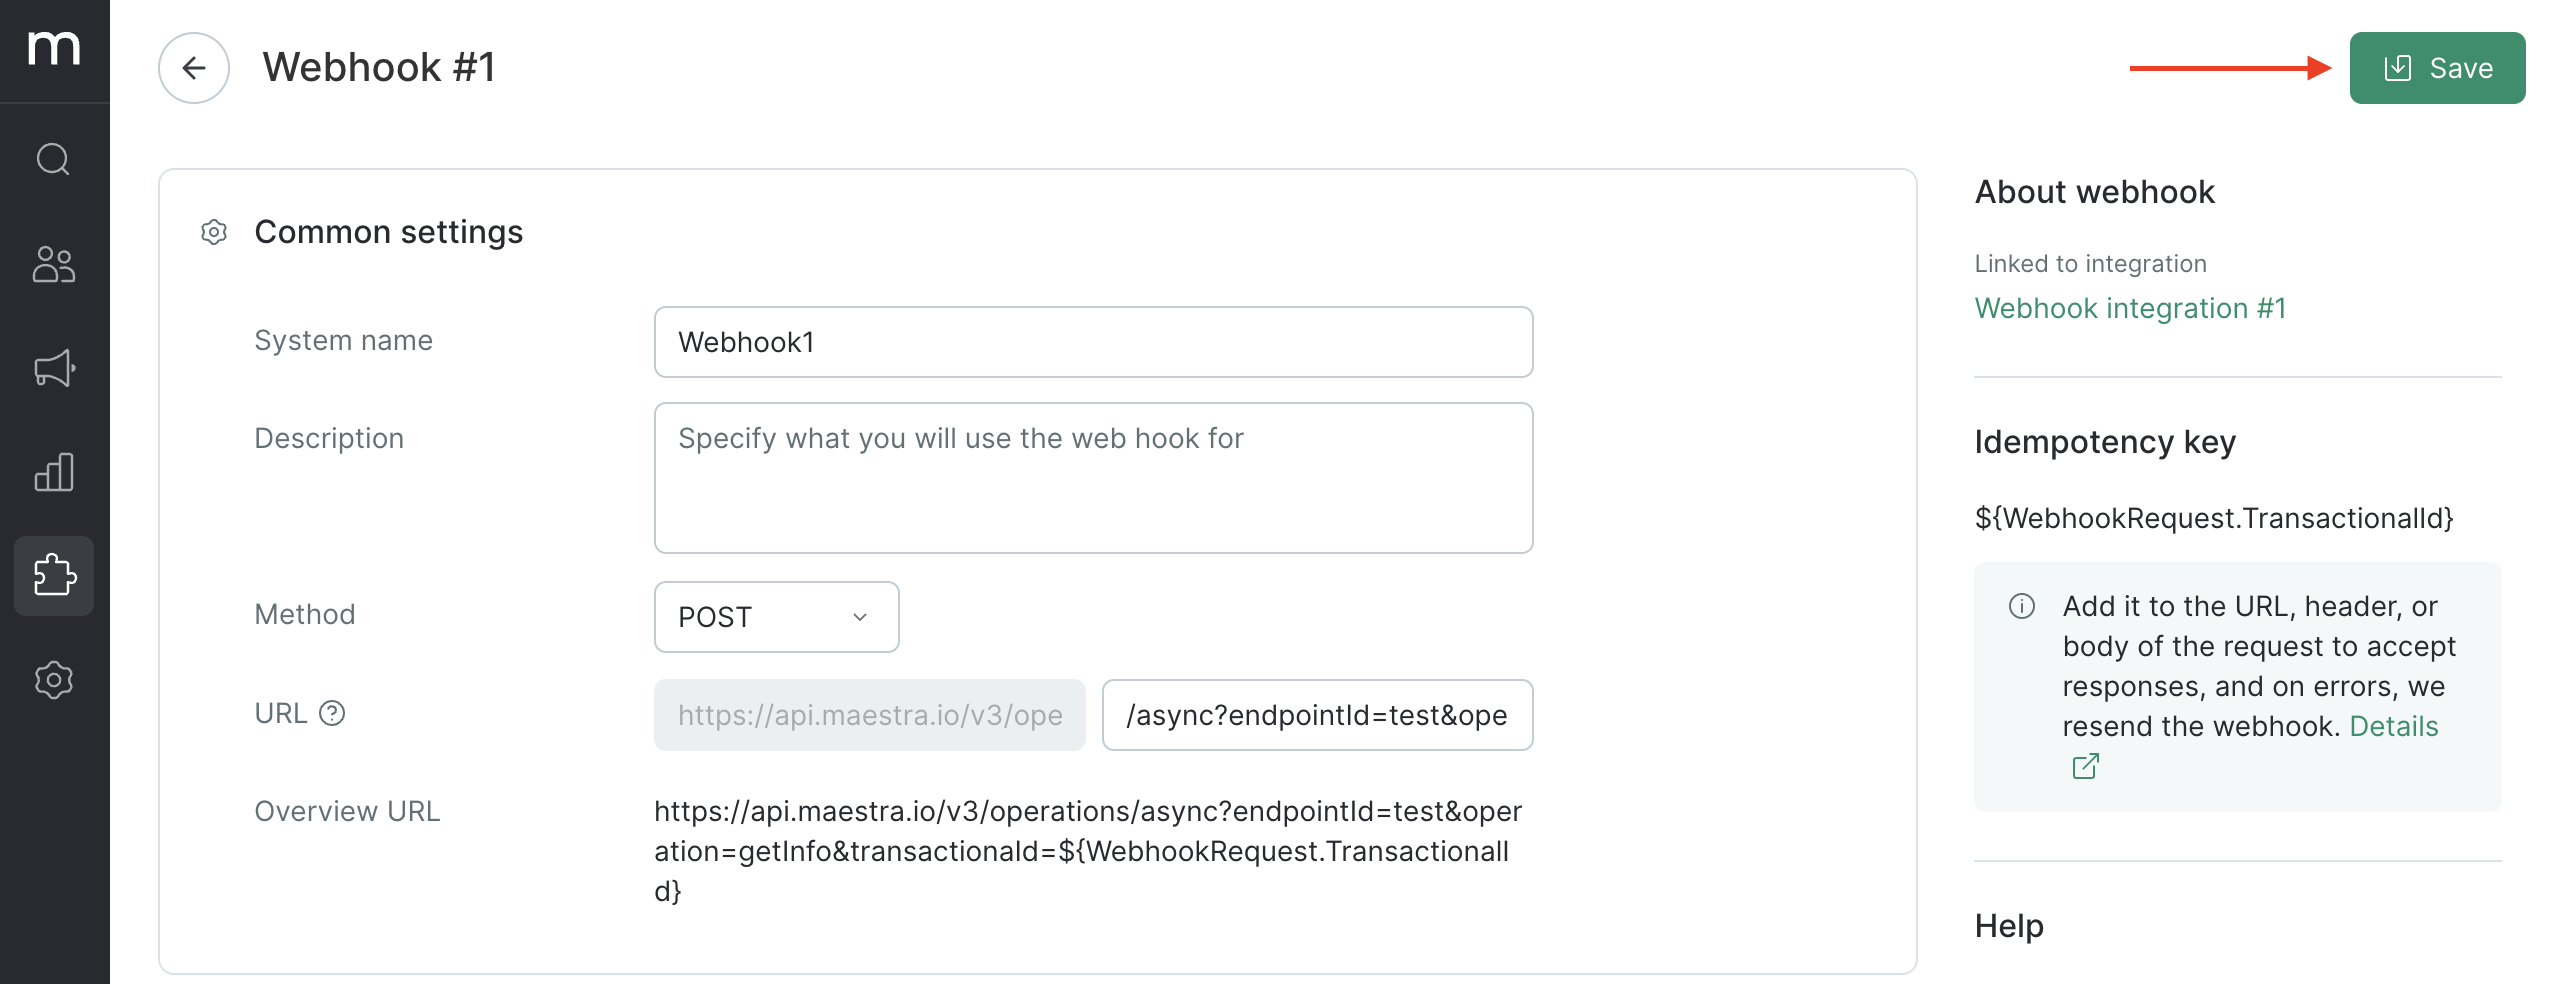
 | Field | What it's for |
| ------------------------ | ----------------------------------------------------------------------------------------------------------------------------------------- |
| **Name** | Use a descriptive name so you'll know what it does at a glance. |
| **System name** | A unique ID used to reference this webhook's response. |
| **Description** | Optional — fill in only if needed. |
| **Method** | `GET`, `POST`, `PUT`, `PATCH`, or `DELETE` — whatever the receiving service expects. |
| **Root URL** | This URL is inherited from the webhook integration — it's shared by every webhook added to that integration. |
| **URL** | The path that gets appended to the root URL from your integration. Leave blank if the webhook integration point already has the full URL. |
| **Overview URL preview** | Shows the full assembled URL. Read-only — just for sanity-checking. |
| Field | What it's for |
| ------------------------ | ----------------------------------------------------------------------------------------------------------------------------------------- |
| **Name** | Use a descriptive name so you'll know what it does at a glance. |
| **System name** | A unique ID used to reference this webhook's response. |
| **Description** | Optional — fill in only if needed. |
| **Method** | `GET`, `POST`, `PUT`, `PATCH`, or `DELETE` — whatever the receiving service expects. |
| **Root URL** | This URL is inherited from the webhook integration — it's shared by every webhook added to that integration. |
| **URL** | The path that gets appended to the root URL from your integration. Leave blank if the webhook integration point already has the full URL. |
| **Overview URL preview** | Shows the full assembled URL. Read-only — just for sanity-checking. |
 By default, a webhook is sent **once**. If the receiving service returns a `5xx` or `429` error, the request is gone.
Adding an idempotency key tells Maestra Platform to safely retry — **up to 3 times over 6 minutes** — without the receiving service treating the retries as new, duplicate events.
Use the template variable:
```text theme={null}
${WebhookRequest.TransactionalId}
```
You can put it in the URL, a header, or the request body. Where it goes depends on what the receiving service expects.
Check your service's API docs before adding this. Some services expect a specific parameter name (`Idempotency-Key`, `request_id`, etc.) or a particular format. If the service doesn't recognize it, you won't get retry protection.
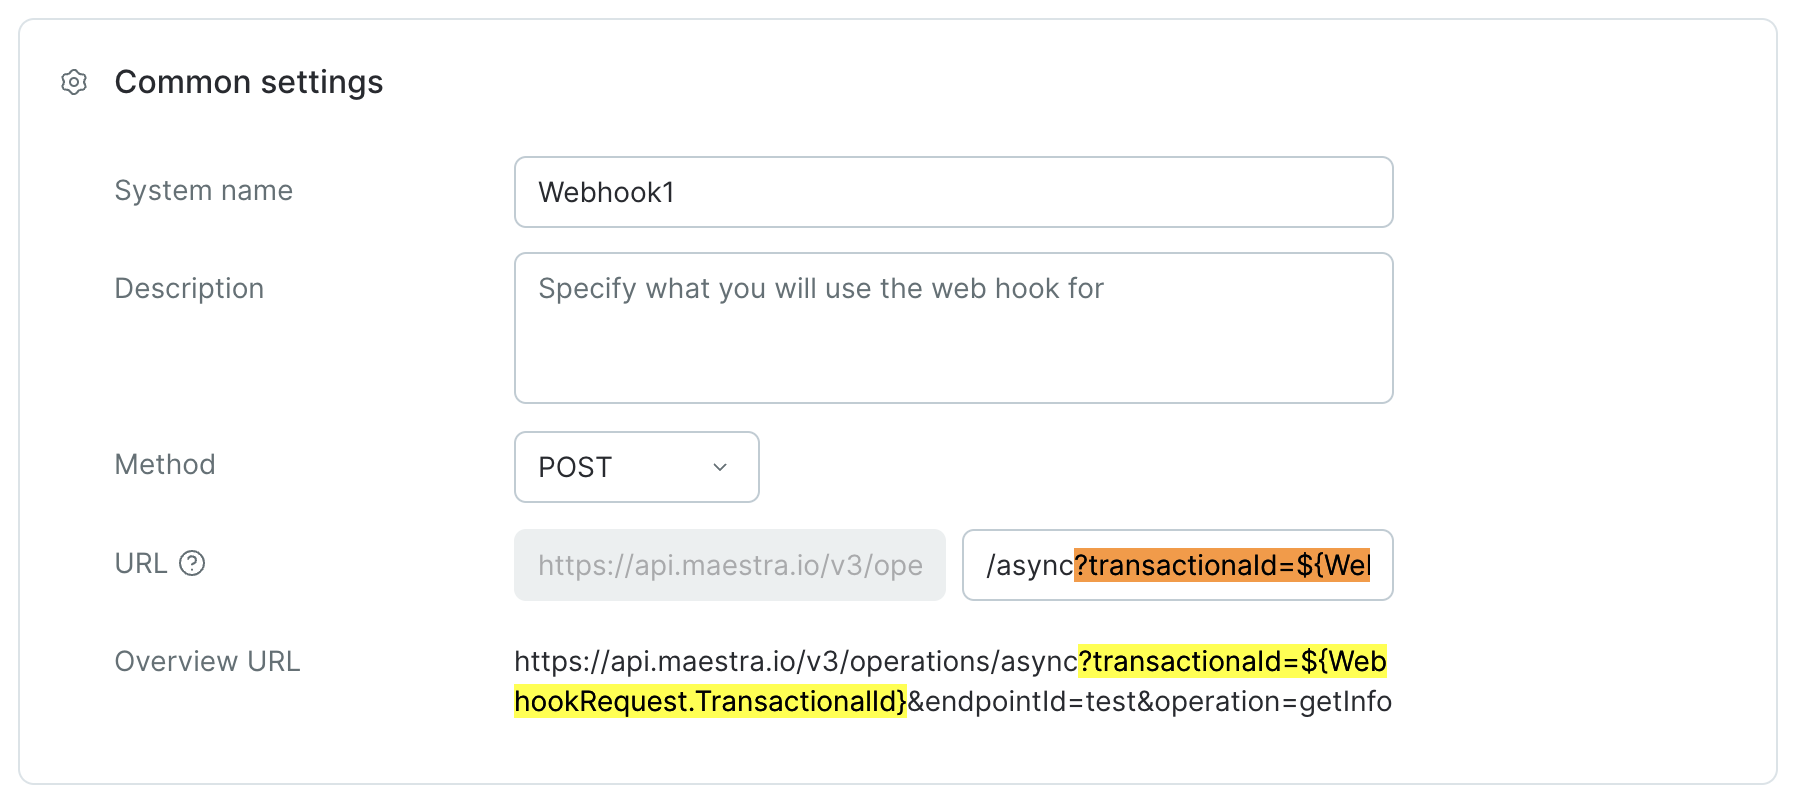
Append it after a `?`:
By default, a webhook is sent **once**. If the receiving service returns a `5xx` or `429` error, the request is gone.
Adding an idempotency key tells Maestra Platform to safely retry — **up to 3 times over 6 minutes** — without the receiving service treating the retries as new, duplicate events.
Use the template variable:
```text theme={null}
${WebhookRequest.TransactionalId}
```
You can put it in the URL, a header, or the request body. Where it goes depends on what the receiving service expects.
Check your service's API docs before adding this. Some services expect a specific parameter name (`Idempotency-Key`, `request_id`, etc.) or a particular format. If the service doesn't recognize it, you won't get retry protection.
Append it after a `?`:
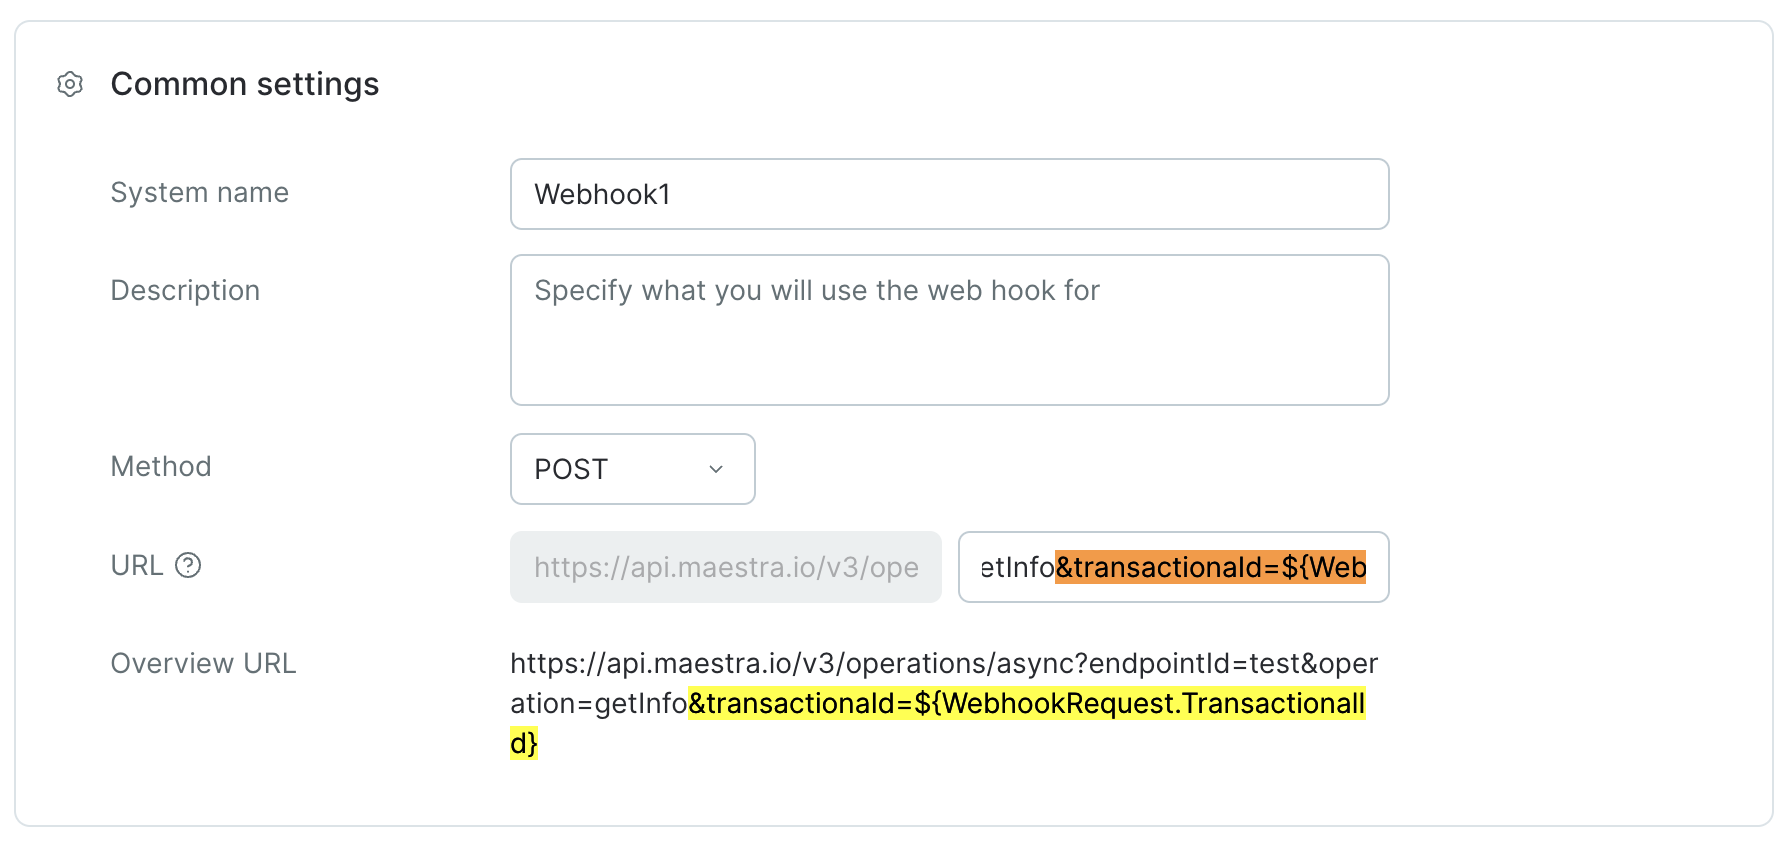
 If the URL already has query parameters, use `&` instead:
 Many APIs (Stripe-style) expect it as a header like `Idempotency-Key: ${WebhookRequest.TransactionalId}`.
Drop it into your JSON payload as a field the receiving service expects, e.g. `"request_id": "${WebhookRequest.TransactionalId}"`.
Headers from the integration are inherited automatically. You can:
* **Turn off** an inherited header by unchecking **Use**.
* **Add** extra headers that only apply to this webhook.
Both inherited and webhook-specific headers go out with the request.
Many APIs (Stripe-style) expect it as a header like `Idempotency-Key: ${WebhookRequest.TransactionalId}`.
Drop it into your JSON payload as a field the receiving service expects, e.g. `"request_id": "${WebhookRequest.TransactionalId}"`.
Headers from the integration are inherited automatically. You can:
* **Turn off** an inherited header by unchecking **Use**.
* **Add** extra headers that only apply to this webhook.
Both inherited and webhook-specific headers go out with the request.
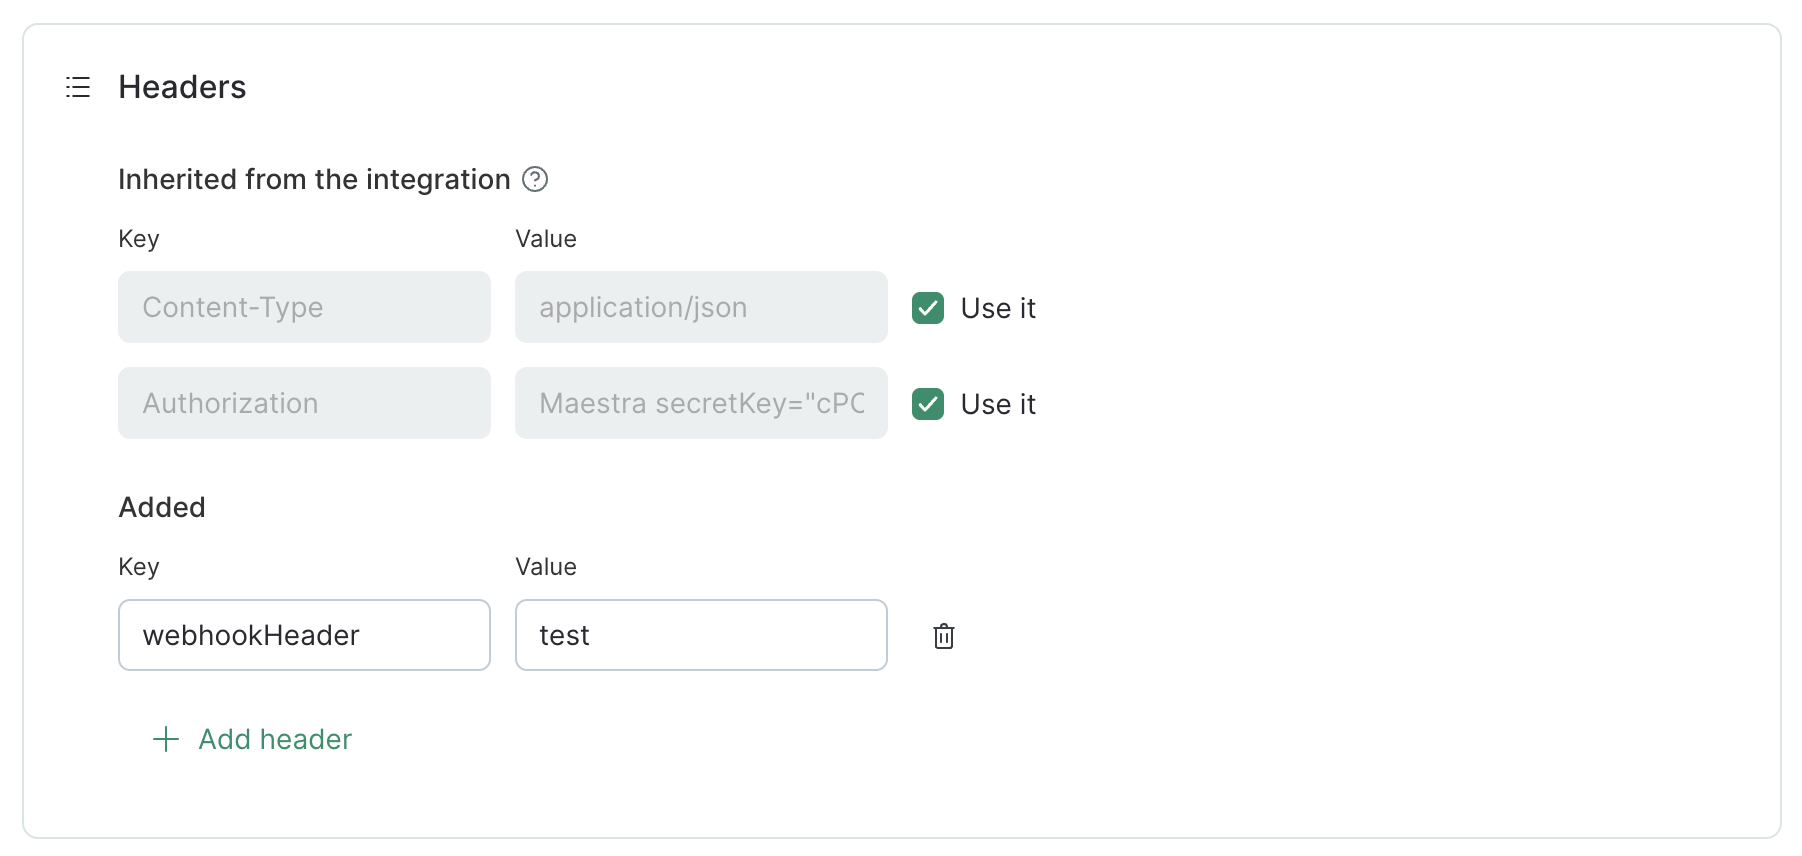 In the example above, the final headers sent are:
```http theme={null}
Content-Type: application/json
webhookHeader: test
```
Drop in a JSON payload and pull in customer data using [dynamic parameters](/campaigns/message-template-engine/what-is-the-message-template-engine) from the message template engine.
You can use:
* **Variables** like `${customer.email}` or `${order.totalPrice}`
* **Conditionals** with [if / else if / end if](/campaigns/message-template-engine/adding-a-condition-ifelse-ifend-if)
* **Loops** with [for / end for](/campaigns/message-template-engine/how-to-use-elements-of-a-collection-with-the-forend-for-loop-and-the-set-keyword) — handy for line items in an order
The right-hand sidebar has the full variable picker.
In the example above, the final headers sent are:
```http theme={null}
Content-Type: application/json
webhookHeader: test
```
Drop in a JSON payload and pull in customer data using [dynamic parameters](/campaigns/message-template-engine/what-is-the-message-template-engine) from the message template engine.
You can use:
* **Variables** like `${customer.email}` or `${order.totalPrice}`
* **Conditionals** with [if / else if / end if](/campaigns/message-template-engine/adding-a-condition-ifelse-ifend-if)
* **Loops** with [for / end for](/campaigns/message-template-engine/how-to-use-elements-of-a-collection-with-the-forend-for-loop-and-the-set-keyword) — handy for line items in an order
The right-hand sidebar has the full variable picker.
 If the receiving service sends back data you want to use later in your flow — an order number, a status, a tracking link — capture it here.
Once captured, you can:
* **Branch the flow** based on whether the call succeeded
* **Personalize the next message** with values from the response
If the receiving service sends back data you want to use later in your flow — an order number, a status, a tracking link — capture it here.
Once captured, you can:
* **Branch the flow** based on whether the call succeeded
* **Personalize the next message** with values from the response
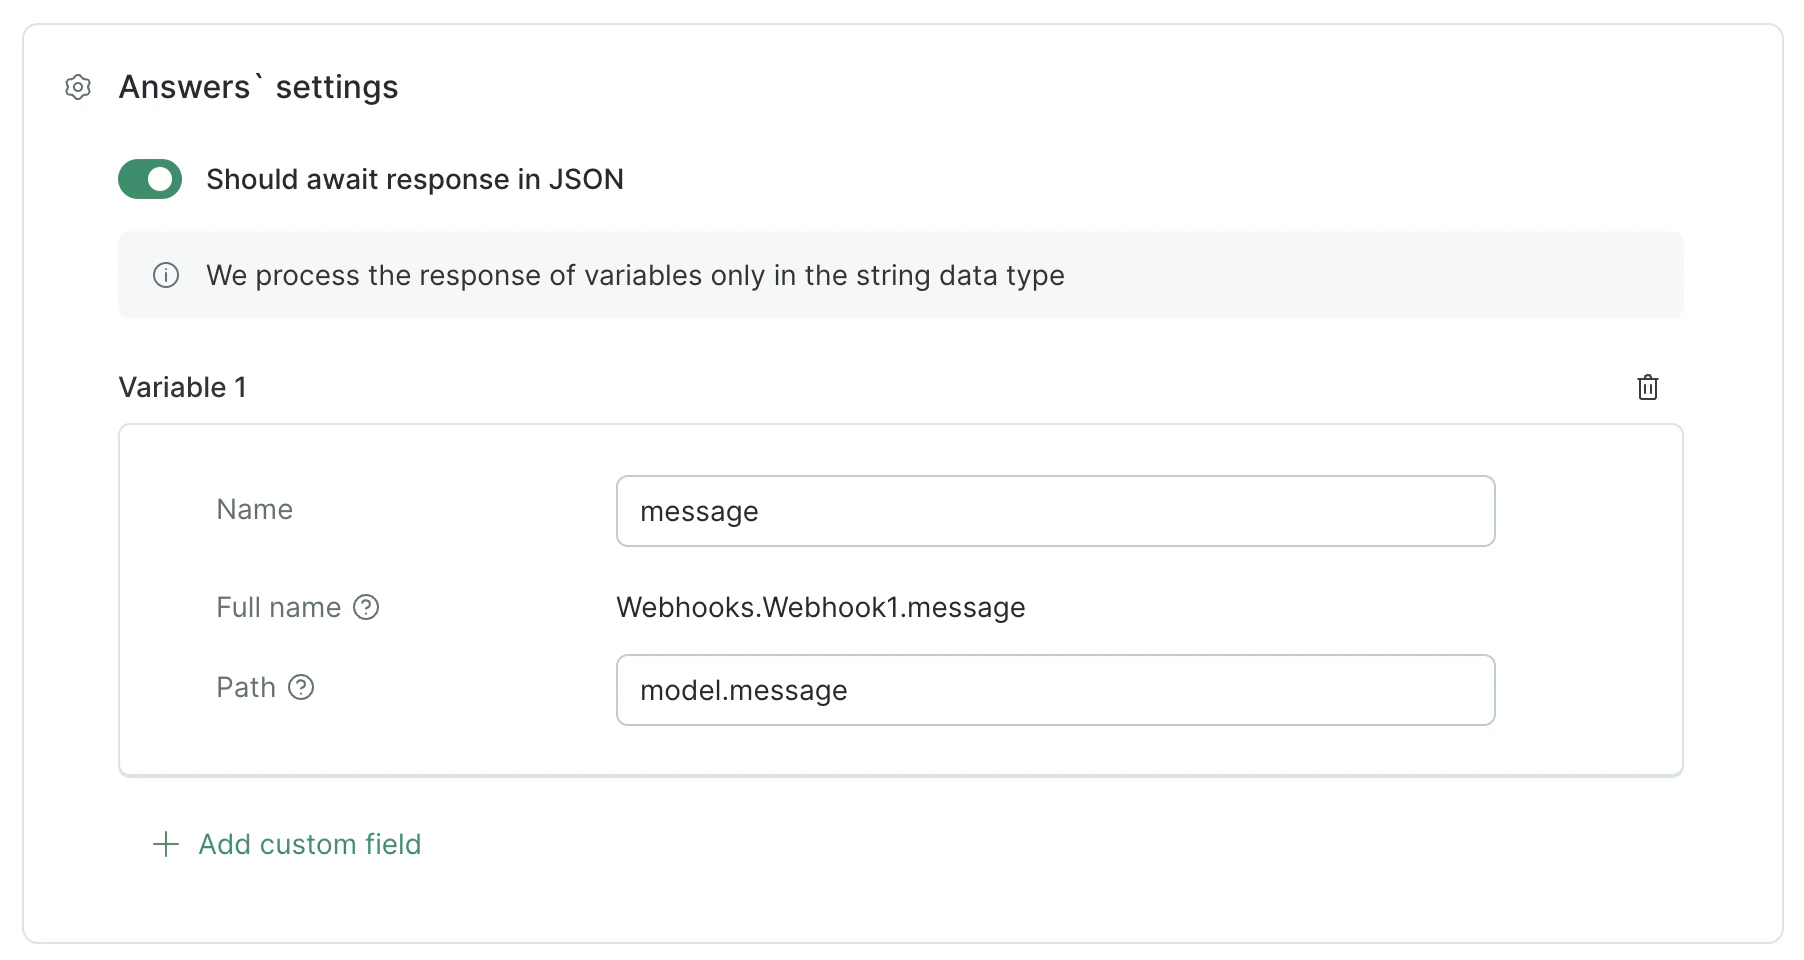 For the full walkthrough, see [How to use webhook responses in flows](/campaigns/webhooks/how-to-use-webhook-responses-in-flows).
 ***
## Cloning a webhook
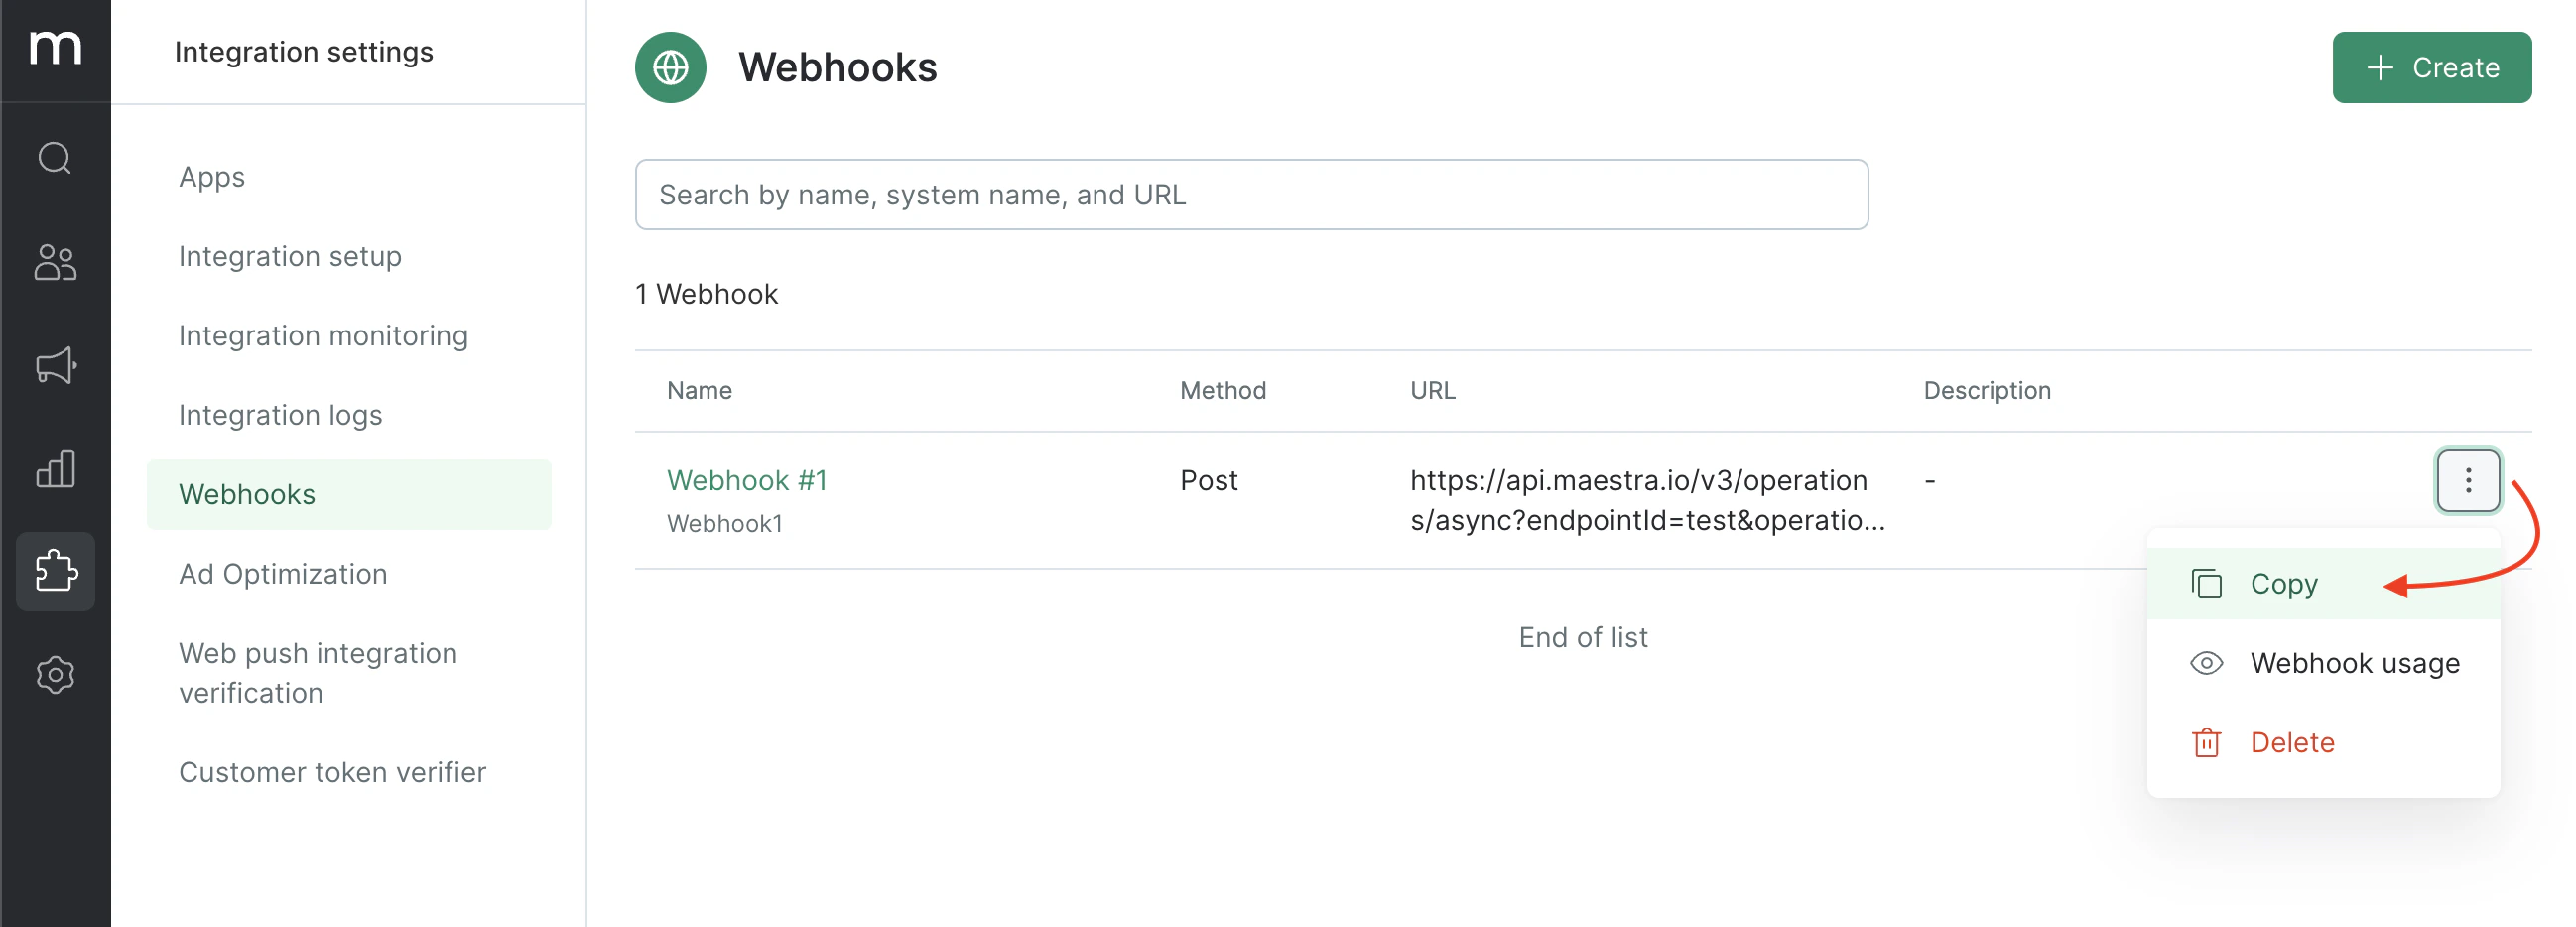
If you need a near-duplicate (same auth, different endpoint or payload), open the webhook's menu and click **Copy** — faster than rebuilding from scratch.
***
## Cloning a webhook
If you need a near-duplicate (same auth, different endpoint or payload), open the webhook's menu and click **Copy** — faster than rebuilding from scratch.
 ## Troubleshooting and monitoring
Once your webhook is live, the [Webhook Logs](/campaigns/webhooks/webhook-logs) view is your source of truth for what was actually sent, what came back, and where things went wrong.
Branch flows or personalize messages with data the receiving service sends back.
Inspect every request and response for debugging and auditing.
Pull live data from an external service into your campaign content.
Reference for variables, conditionals, and loops in your request body.
## Troubleshooting and monitoring
Once your webhook is live, the [Webhook Logs](/campaigns/webhooks/webhook-logs) view is your source of truth for what was actually sent, what came back, and where things went wrong.
Branch flows or personalize messages with data the receiving service sends back.
Inspect every request and response for debugging and auditing.
Pull live data from an external service into your campaign content.
Reference for variables, conditionals, and loops in your request body.