> ## Documentation Index
> Fetch the complete documentation index at: https://help.maestra.io/llms.txt
> Use this file to discover all available pages before exploring further.
# How to Create Pop-ups
**To Create a pop-up:**
1. Go to **Campaigns Manager→ Create campaign**
2. **Personalization → Pop-up**.
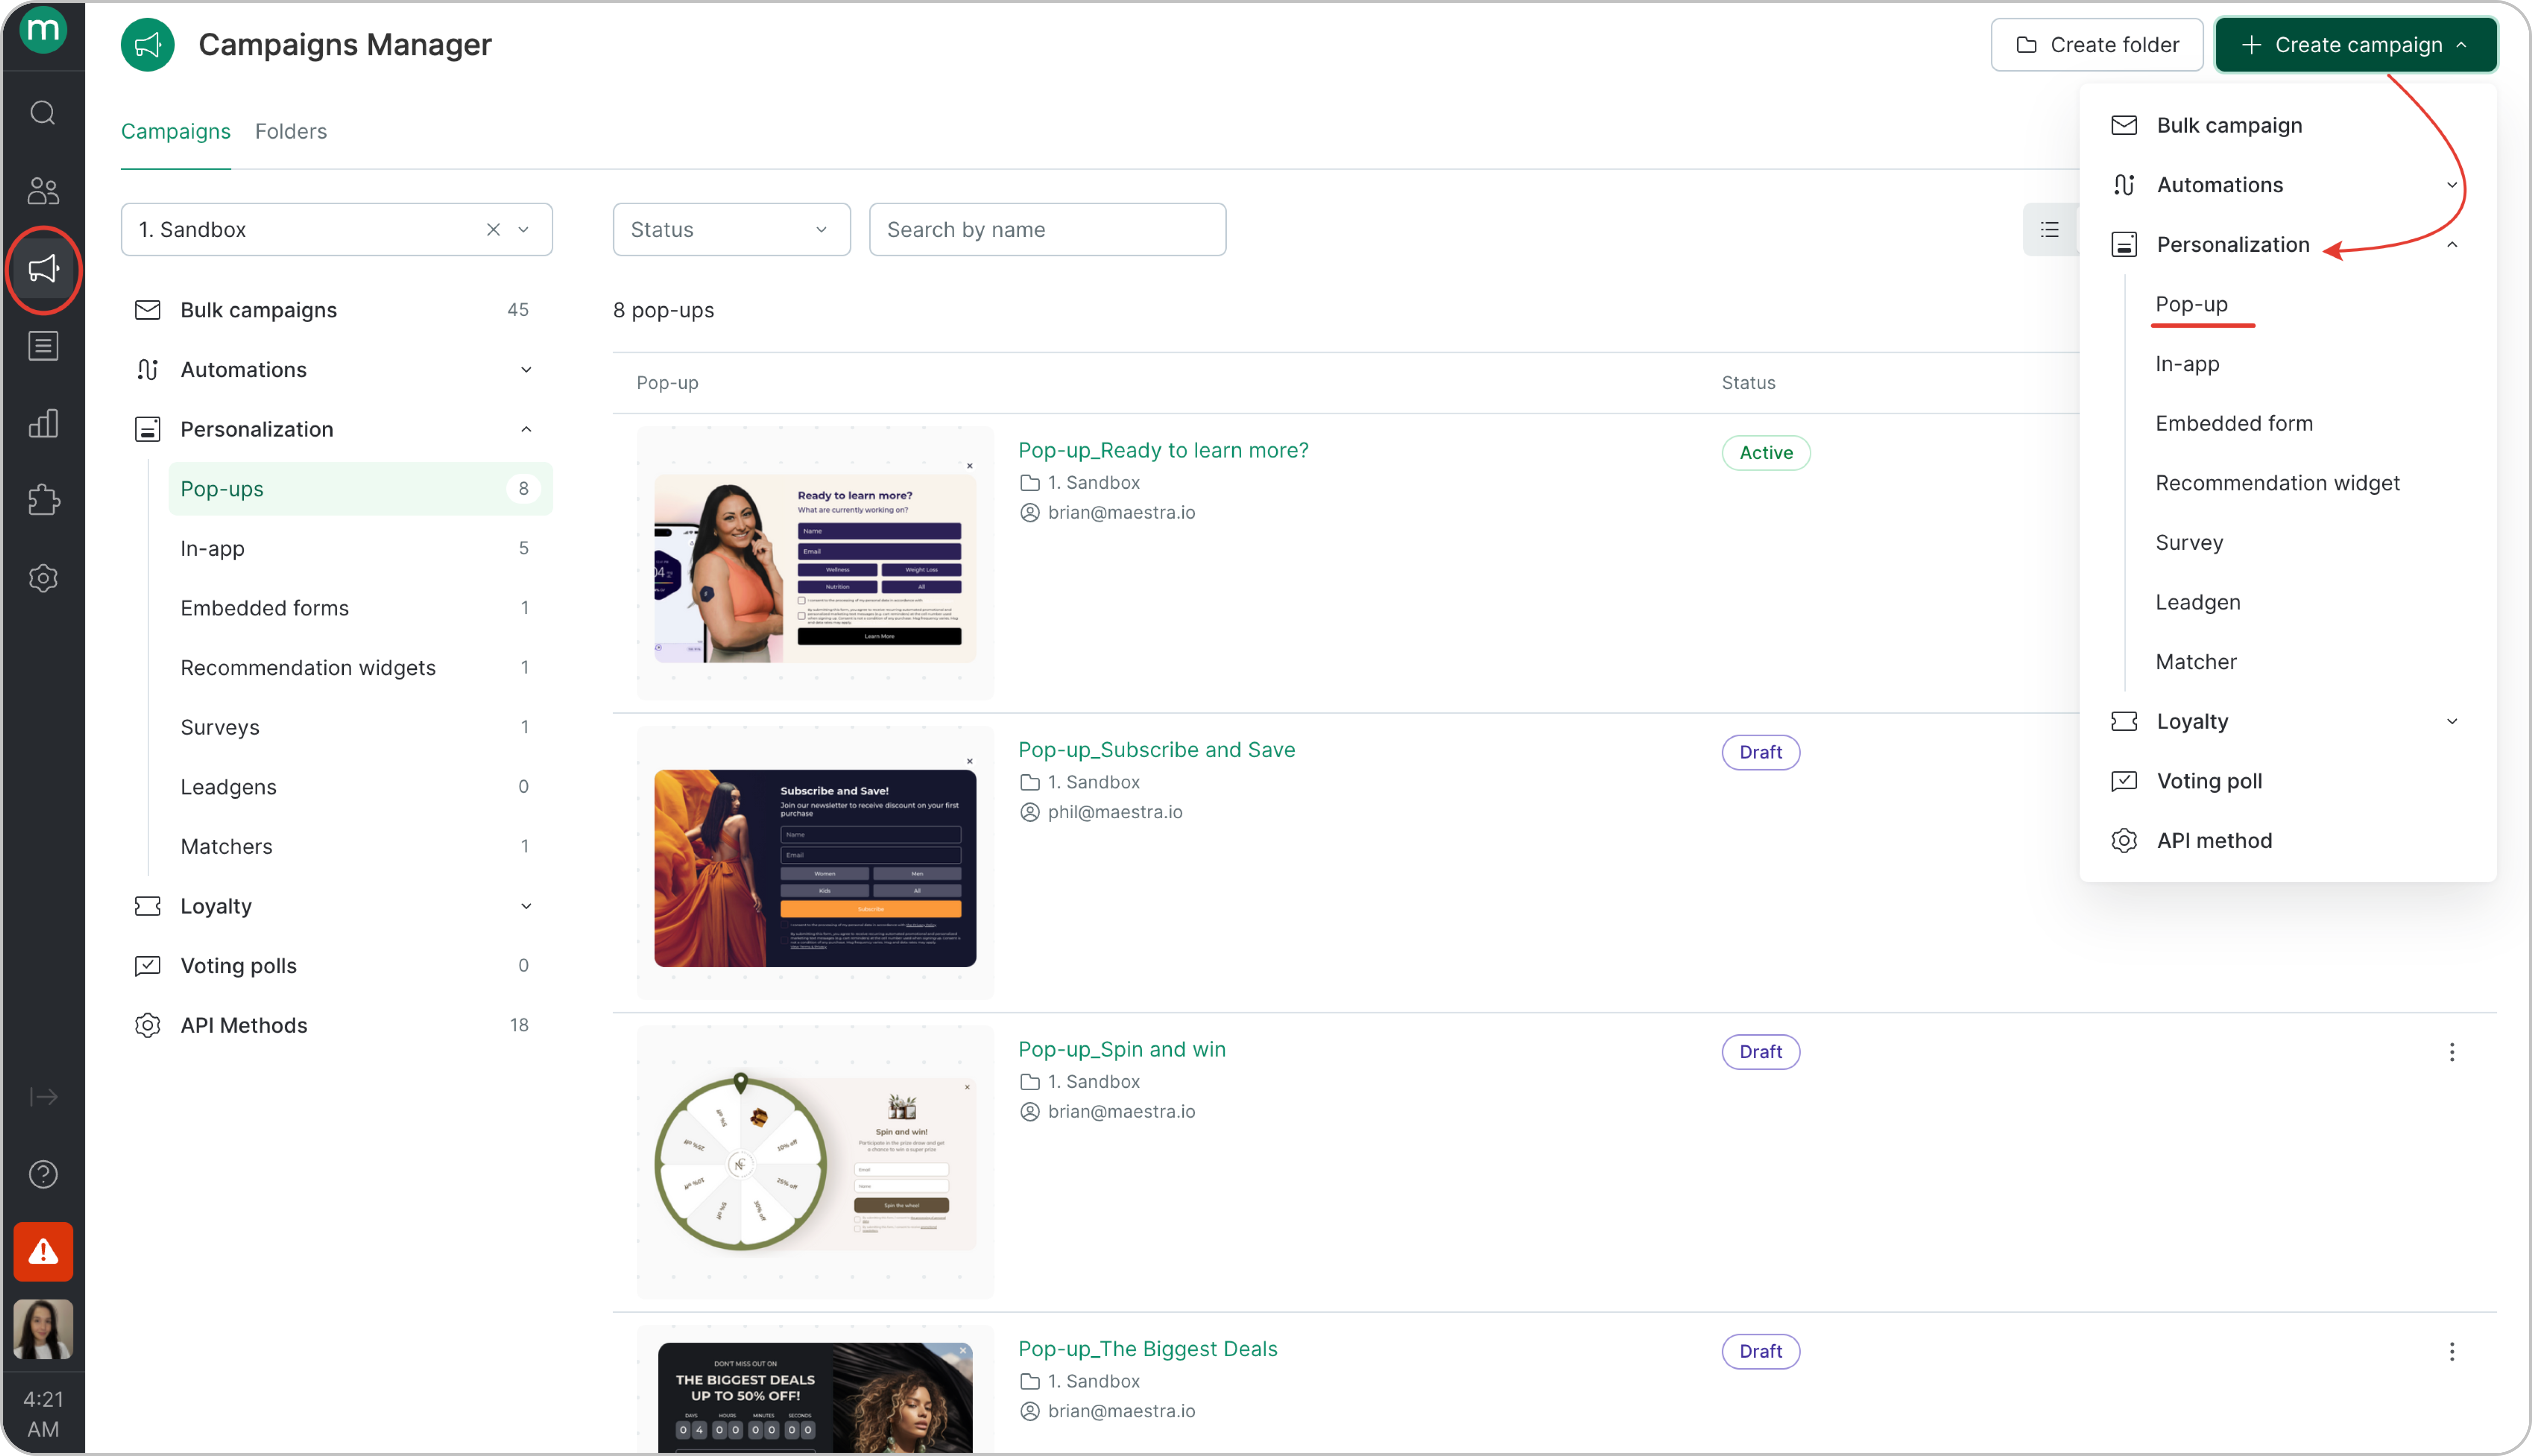 Choose a folder and click **Create**.
.png?fit=max&auto=format&n=05-EV9YqA_RINTJ8&q=85&s=fda82b14f64303d316bcb824747d9d5e) **To work with product list data and browsed products, full integration is required.**
Follow the instructions to configure the settings: [https://developers.maestra.io/page/website-personalization](https://developers.maestra.io/page/website-personalization)
## **Choose a template**
Next, choose a template depending on the purpose of the pop-up. You can use it to:
* Generate leads
* Increase conversion & average order value
* Notify visitors
* Conduct a survey
**To work with product list data and browsed products, full integration is required.**
Follow the instructions to configure the settings: [https://developers.maestra.io/page/website-personalization](https://developers.maestra.io/page/website-personalization)
## **Choose a template**
Next, choose a template depending on the purpose of the pop-up. You can use it to:
* Generate leads
* Increase conversion & average order value
* Notify visitors
* Conduct a survey
.png?fit=max&auto=format&n=PP-BodS5bFF14NYd&q=85&s=51e286b80c2ef29890f35d31046fc2fe) After choosing a template, specify your website and click the **Proceed** button.
After choosing a template, specify your website and click the **Proceed** button.
 ## **Edit the template**
Once the pop-up is created, click the **Edit** button **.**
## **Edit the template**
Once the pop-up is created, click the **Edit** button **.**
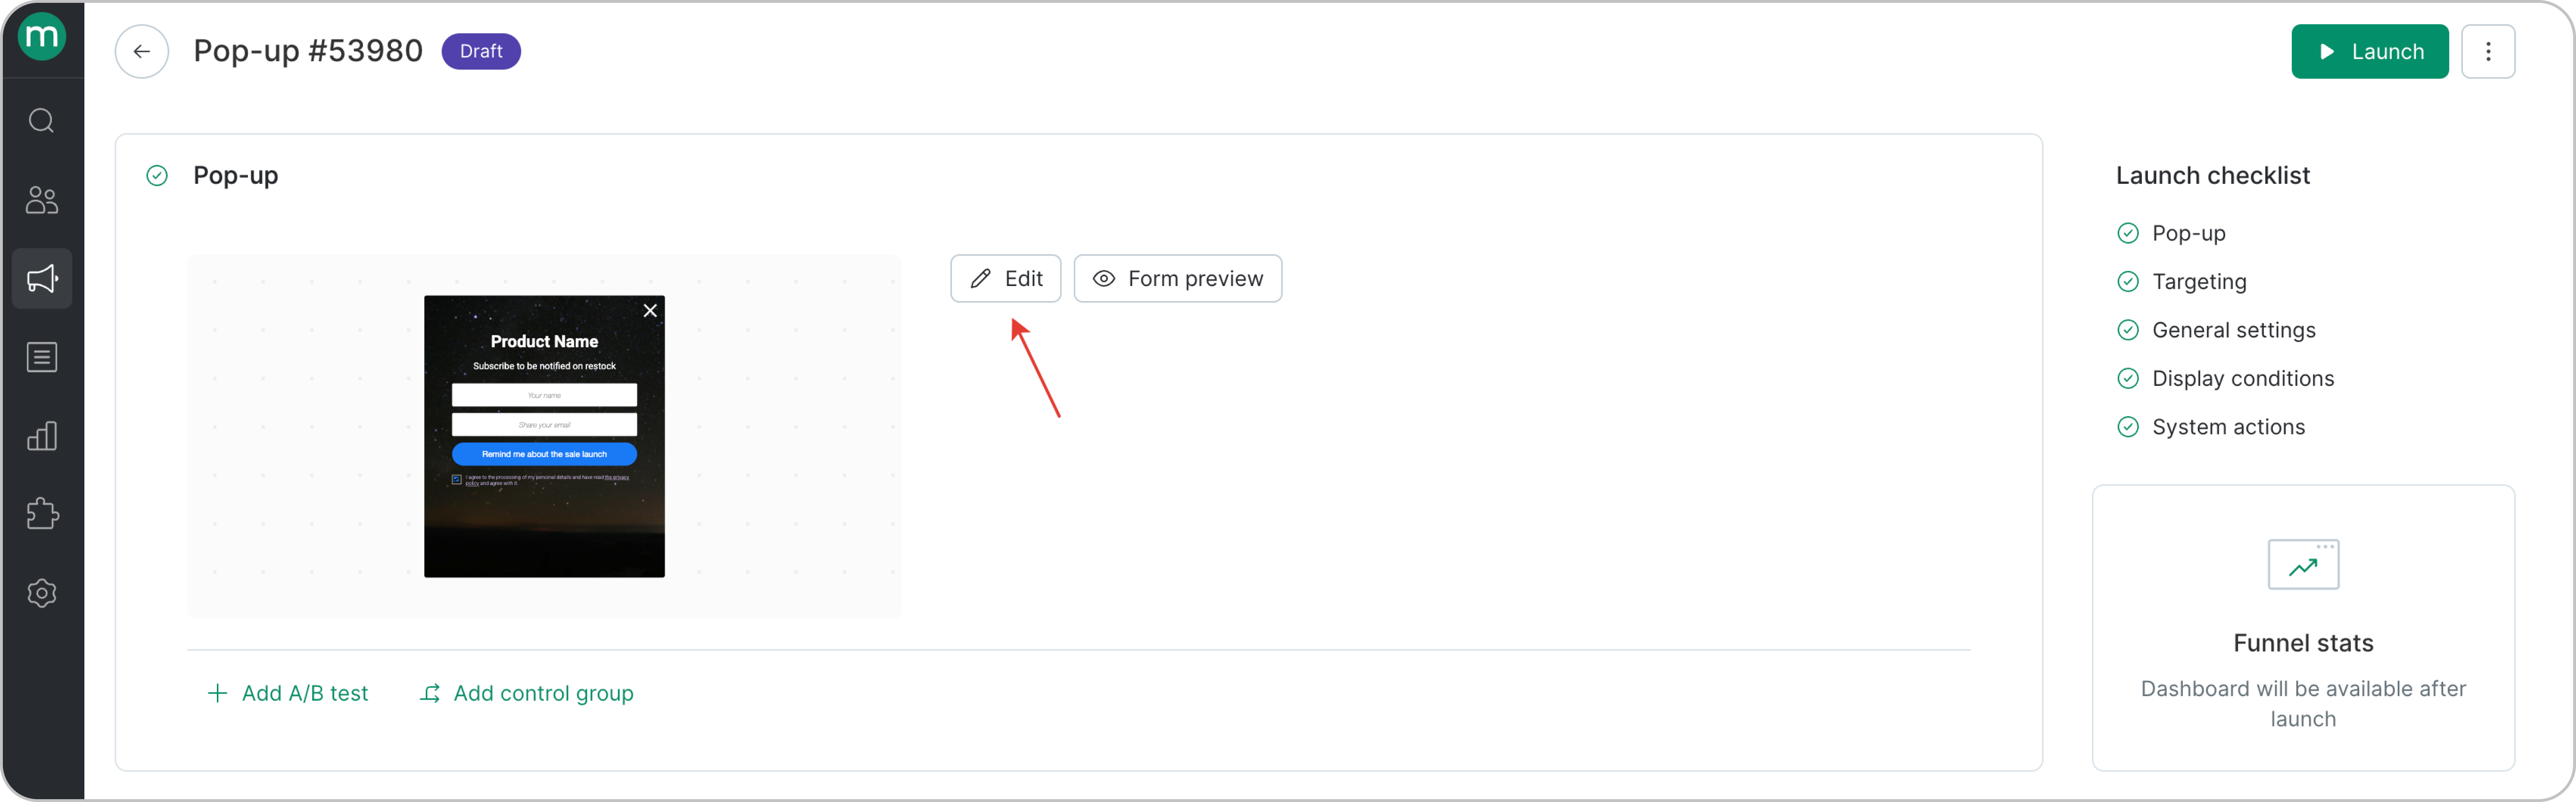 On the Pop-up editing page click the **Edit** button.
.png?fit=max&auto=format&n=05-EV9YqA_RINTJ8&q=85&s=1d6b9a24ddf856aa6213c814adfbced7) The form editing window is displayed below.
The form editing window is displayed below.
.png?fit=max&auto=format&n=05-EV9YqA_RINTJ8&q=85&s=a99a65c0365d0e9302316137f591ba55) **Here you can:**
* Adjust the pop-up’s **position** on the website (Form position **button)**
* Check how the pop-up **displays on** **different devices (Desktop/Tablet/Phone)**.
* Configure **background color, icons, border and field sizes, fonts, privacy policy** and other visual options.
**Here you can:**
* Adjust the pop-up’s **position** on the website (Form position **button)**
* Check how the pop-up **displays on** **different devices (Desktop/Tablet/Phone)**.
* Configure **background color, icons, border and field sizes, fonts, privacy policy** and other visual options.
.png?fit=max&auto=format&n=05-EV9YqA_RINTJ8&q=85&s=a1ad410c0c8c617bd34b33dd1cfe1753) * Edit the pop-up directly in HTML code (\<>Code button)
* Configure the main screen and the confirmation screen after the customer completes the action.
* Preview the form on your website.
## **New pop-up templates**
New templates allow you to create forms that are different for each device. They are also easier and more intuitive to configure. You can find them in the gallery, where they are marked with a "New" label.
* Edit the pop-up directly in HTML code (\<>Code button)
* Configure the main screen and the confirmation screen after the customer completes the action.
* Preview the form on your website.
## **New pop-up templates**
New templates allow you to create forms that are different for each device. They are also easier and more intuitive to configure. You can find them in the gallery, where they are marked with a "New" label.
.png?fit=max&auto=format&n=05-EV9YqA_RINTJ8&q=85&s=c5d300b9d06404db84ca7e7cb5e234db) *
### Pop-up editing pageWhen you open a page, you’ll see a list of elements included in the form. You can move, delete, or add new ones.
*
### Pop-up editing pageWhen you open a page, you’ll see a list of elements included in the form. You can move, delete, or add new ones.
.png?fit=max&auto=format&n=05-EV9YqA_RINTJ8&q=85&s=51f80f99a37eb4bcdb56c4094565a7d8) In addition to basic input fields, new templates also support adding:
* timer
* promo code field
* option buttons
* close button
In addition to basic input fields, new templates also support adding:
* timer
* promo code field
* option buttons
* close button
.png?fit=max&auto=format&n=05-EV9YqA_RINTJ8&q=85&s=d1e3e36c4fe0869a6a907fccbfbe4ee0) *
### **Editing elements**To edit an element, click it in the list or on the preview.
*
### **Editing elements**To edit an element, click it in the list or on the preview.
.png?fit=max&auto=format&n=PP-BodS5bFF14NYd&q=85&s=a90c66d8340ba9ea73f7cda0ea39e3e8) New templates allow you to customize each text element for different screens, including font style, size, color, and alignment.
*
### **Device-specific design**By default, most elements automatically sync and adjust to the mobile version.To set custom properties, disable synchronization and configure settings for the specific device.
##
New templates allow you to customize each text element for different screens, including font style, size, color, and alignment.
*
### **Device-specific design**By default, most elements automatically sync and adjust to the mobile version.To set custom properties, disable synchronization and configure settings for the specific device.
## .png?fit=max&auto=format&n=PP-BodS5bFF14NYd&q=85&s=416f6c3d2897a545a5e8696554bd40bc) ### **General form settings**To adjust general form settings (font, close button, layout, etc.), go back to the General settings page.
### **General form settings**To adjust general form settings (font, close button, layout, etc.), go back to the General settings page.
.png?fit=max&auto=format&n=PP-BodS5bFF14NYd&q=85&s=f86b1dd6510000a0bfb58d053279b770)
.png?fit=max&auto=format&n=PP-BodS5bFF14NYd&q=85&s=b47a10b31bc41fe8346dc190e12654ea) With the new templates, you can set a fixed height for all screens. This is useful when screens contain different content and their heights vary.
*
### **Saving data when closing the second screen**For templates with multiple main screens, you can configure the form to save entered data when the second screen is closed.In this case, all fields on the second screen become optional.
To enable: open **General settings desktop→ Data transfer → User data** and activate the option.
With the new templates, you can set a fixed height for all screens. This is useful when screens contain different content and their heights vary.
*
### **Saving data when closing the second screen**For templates with multiple main screens, you can configure the form to save entered data when the second screen is closed.In this case, all fields on the second screen become optional.
To enable: open **General settings desktop→ Data transfer → User data** and activate the option.
.png?fit=max&auto=format&n=PP-BodS5bFF14NYd&q=85&s=3ed21f563a4ad7c1698b34d5744fdaa2) We only recommend using this option if the first screen **includes a mandatory privacy policy checkbox** to ensure that the user has explicitly consented to data transfer and communications.
## **Targeting**
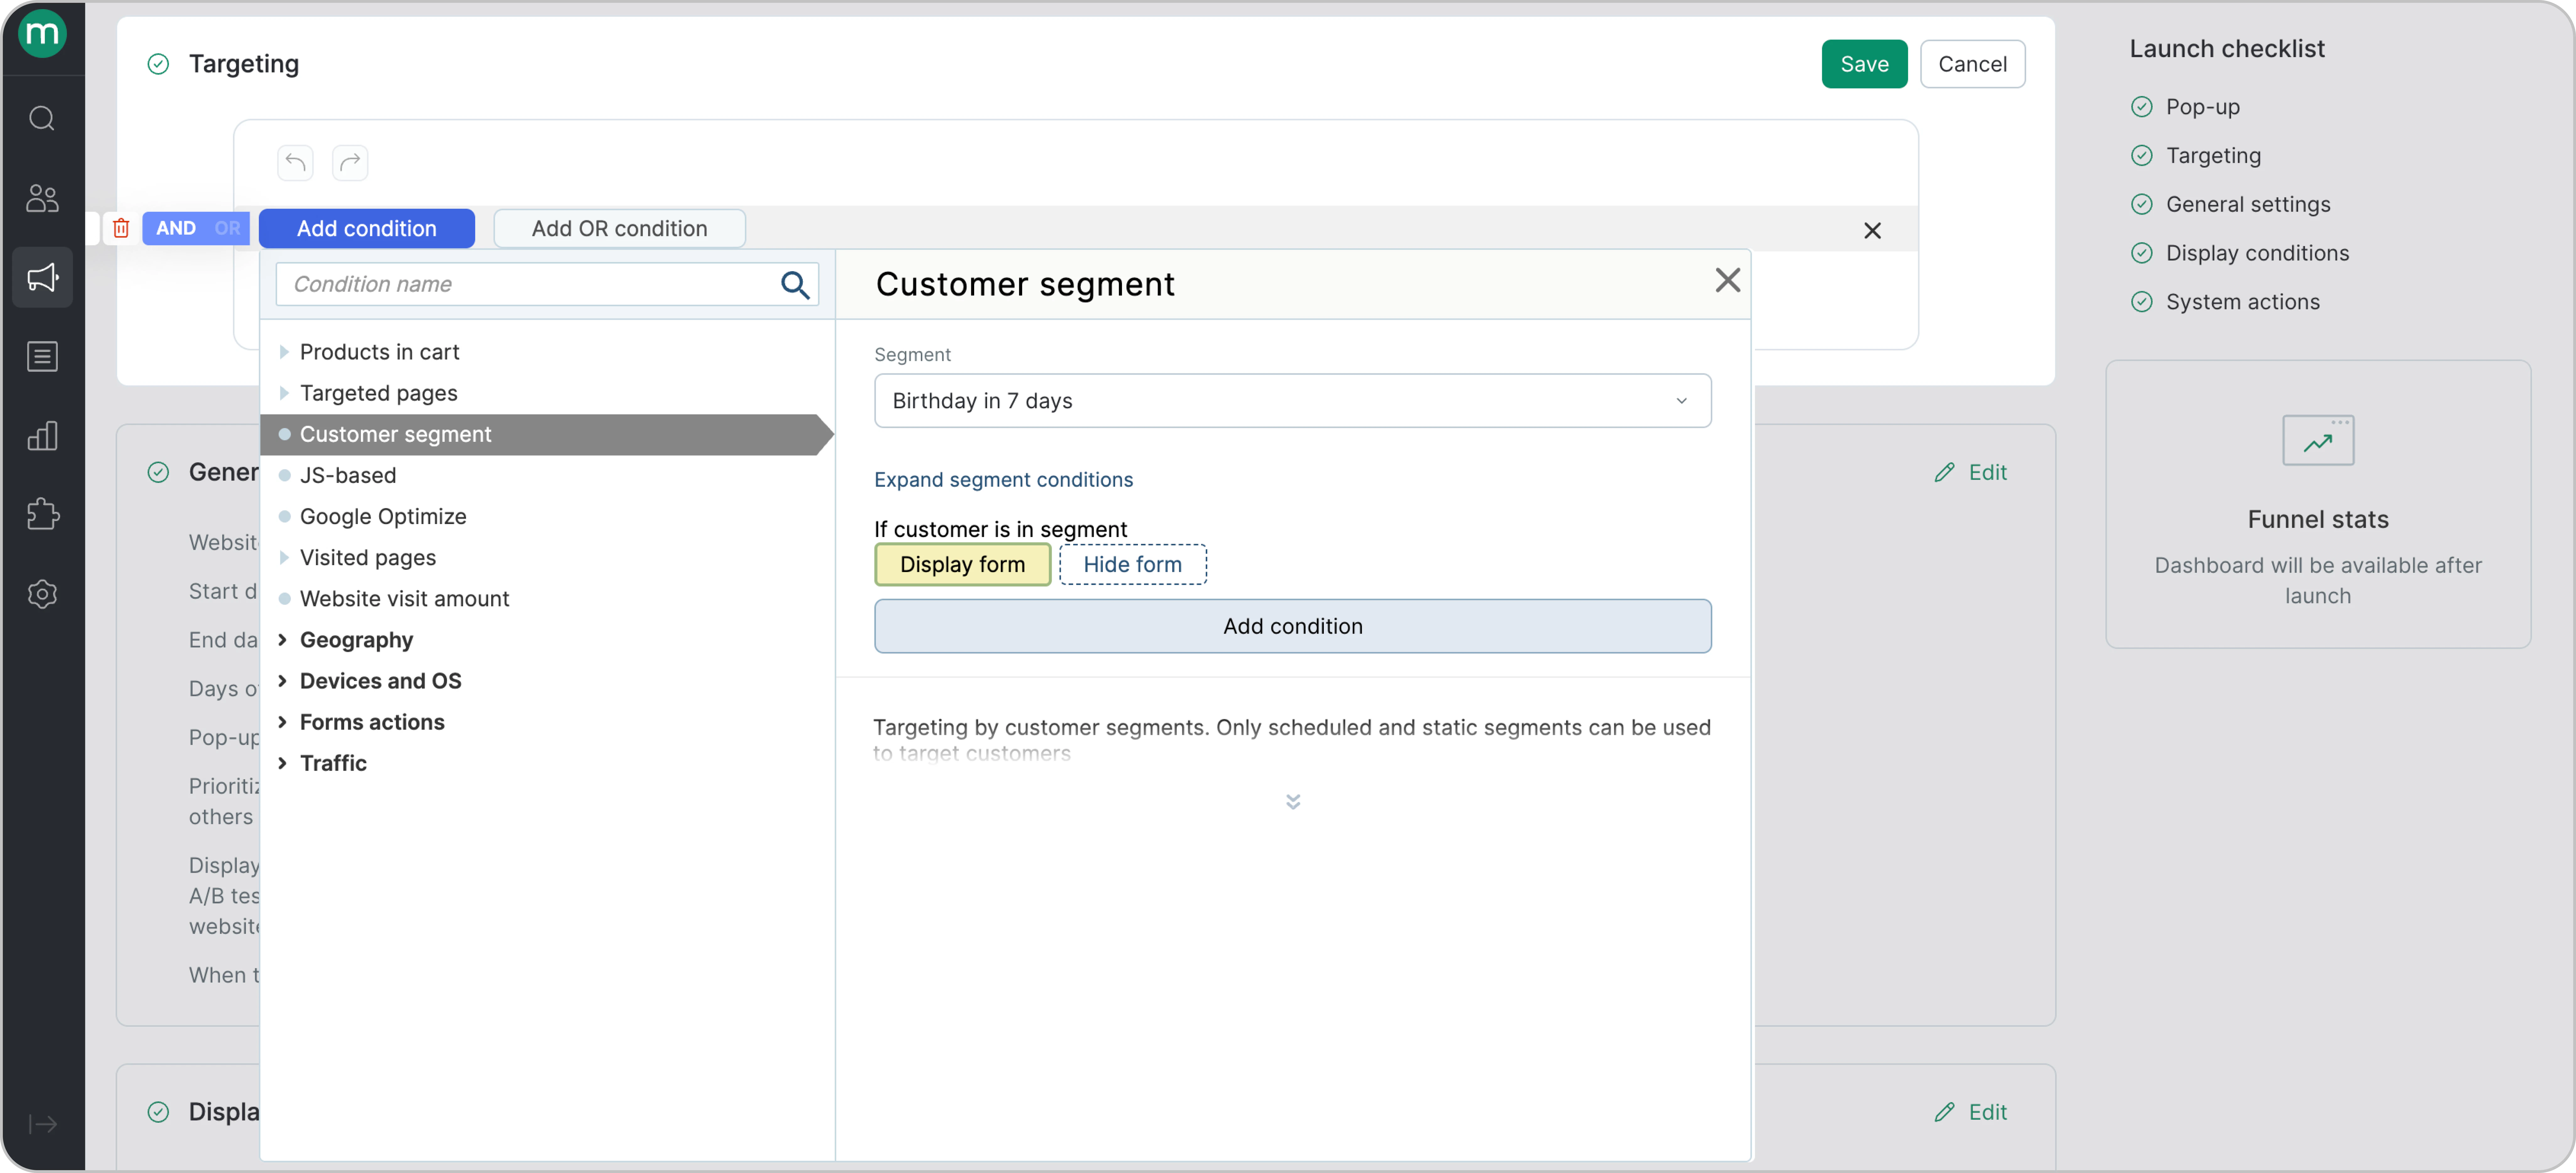
Use filters to define who will see the pop-up and under what conditions.You can preconfigure a customer segment and show (or hide) the form for that segment.
For example, here’s a filter for customers whose birthday is in 7 days (segment created in advance)
We only recommend using this option if the first screen **includes a mandatory privacy policy checkbox** to ensure that the user has explicitly consented to data transfer and communications.
## **Targeting**
Use filters to define who will see the pop-up and under what conditions.You can preconfigure a customer segment and show (or hide) the form for that segment.
For example, here’s a filter for customers whose birthday is in 7 days (segment created in advance)
 ## General Settings
In **General settings**, specify:
* Website
* Days of the week for display
* Frequency of appearance
* Whether the form is **priority**. If checked, the pop-up will appear even if frequency limits per visitor are set in the “Pop-up frequency control” section.
For example, these are the settings for a form that will be displayed daily, but will only pop up once for each user during a visit to the site (and form is a priority).
## General Settings
In **General settings**, specify:
* Website
* Days of the week for display
* Frequency of appearance
* Whether the form is **priority**. If checked, the pop-up will appear even if frequency limits per visitor are set in the “Pop-up frequency control” section.
For example, these are the settings for a form that will be displayed daily, but will only pop up once for each user during a visit to the site (and form is a priority).
.png?fit=max&auto=format&n=PP-BodS5bFF14NYd&q=85&s=56707b3a4ef7b5db3a4d4f2c311ab51d) ## **Display conditions**
Next, set the pop-up display conditions: 1. By set of conditions
* After Exit intent (cursor leaves the active page area) - only for desktop campaigns.
* After page scrolled for X %
* After a certain time spent on the page.
* After visiting a defined number of pages.
* After being inactive for period of time
* On a specific action performed on the website.2. Immidiately after falling into target group 3. After API-request or click on call-to-action button
For example, these are the settings for a form that will be displayed for a customer who has visited two pages of the site in total.
## **Display conditions**
Next, set the pop-up display conditions: 1. By set of conditions
* After Exit intent (cursor leaves the active page area) - only for desktop campaigns.
* After page scrolled for X %
* After a certain time spent on the page.
* After visiting a defined number of pages.
* After being inactive for period of time
* On a specific action performed on the website.2. Immidiately after falling into target group 3. After API-request or click on call-to-action button
For example, these are the settings for a form that will be displayed for a customer who has visited two pages of the site in total.
.png?fit=max&auto=format&n=PP-BodS5bFF14NYd&q=85&s=36e07b05bb0cc1908aceb335307bad26) Page views and visits are counted starting from the moment the popup script is installed on the site. If installed yesterday, data is only available from that point.
## **What happens after form was filled & Custom JS-calls**
Page views and visits are counted starting from the moment the popup script is installed on the site. If installed yesterday, data is only available from that point.
## **What happens after form was filled & Custom JS-calls**
.png?fit=max&auto=format&n=PP-BodS5bFF14NYd&q=85&s=ab09c12c7284e53b88842725f67db32d) In this section, define what happens with the submitted data:
* Create new customer or edit an existing one
* Add an action
* Transfer events to Google Analytics
* Call custom JS code. The available actions depend on the selected template.
## **How to test the pop-up on your website**
Click Form preview. Insert your website link and open it.
In this section, define what happens with the submitted data:
* Create new customer or edit an existing one
* Add an action
* Transfer events to Google Analytics
* Call custom JS code. The available actions depend on the selected template.
## **How to test the pop-up on your website**
Click Form preview. Insert your website link and open it.
.png?fit=max&auto=format&n=PP-BodS5bFF14NYd&q=85&s=d2eb7ffedc1897b808ebbb50146a4086) You will then see the pop-up live on your site.
You will then see the pop-up live on your site.
.png?fit=max&auto=format&n=PP-BodS5bFF14NYd&q=85&s=8c659420327eabb00d0557ff98ee4efc)