

Step 1. Choose the import type
- Pick the import type — Customers.
- Pick the action:
- Add new customers — loads only customers who aren’t in the database yet. Existing customers aren’t edited.
- Add and edit — loads new customers and updates existing ones.
Step 2. Prepare and upload the file
Work out which fields you need. The file has to contain every required field.The file needs at least one customer identifier: email, phone, or an external ID. All other fields are optional.
Multi-brand accounts: if your account uses multi-brand, the global, channel, and topic subscription columns apply within the brand of the touchpoint. See How to subscribe customers to a brand.
- Format:
.csvor.txt. - Check that the values match the allowed formats.
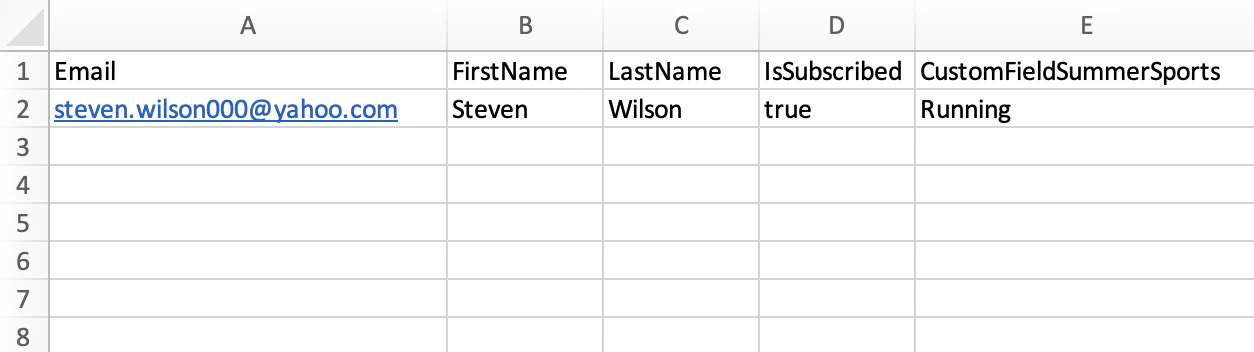
Step 3. Map the file’s fields
Maestra Platform maps the file’s columns to its own fields automatically. Check the result and adjust it by hand if you need to:- In the Import column, tick the fields you want to load. Unticked columns are skipped.
- In the Maestra field column, map each file column to a field on the account. Optional fields left unmapped are skipped.
Step 4. Configure the import
This step sets extra parameters for the import action:- Data source — the integration point the data came through. Affects how the customer’s actions are attributed. Defaults to the Maestra admin panel.
- Segment — a static segment every customer in the file is added to.
- Customer action — whether to issue an action when the customer is created. Defaults to Issue.
- Comment — a description of the import. Makes it easier to find in the list later.
Set an action template
Accounts created after September 24, 2026 don’t get an action when a customer is created, so the Configure customer action block isn’t available. If you’re not sure when your account was created, check with your account manager.
- Source action — the action the customer enters the database with. Affects segmentation and analytics.
- Touchpoint — the channel or integration the action is tied to. Defaults to detecting it automatically from the integration point. To tie customers to a specific website or store, pick the touchpoint manually.
- Every customer in the file has the same template — pick the action in the settings.
-
Customers in the file have different templates — add the template’s system name to the file:
- for the source action, in the column with the system name of the action the customer entered the database with;
- for the edit action, in the column with the system name of the personal action for the customer’s last update.
You can only set the edit action in the file, and only with a template in the Personal action category. Otherwise, changes to the customer are saved without recording an action.
Set a touchpoint
If the touchpoint you need doesn’t exist yet, create it in advance or from the link on the import page. You can set the touchpoint in two ways:- Every customer in the file has the same touchpoint — pick the integration point with the touchpoint you need, or set the touchpoint explicitly in the settings.
-
Customers in the file have different touchpoints — add the touchpoints’ external IDs to the file:
- for the source action, in the column with the touchpoint external ID for the source action;
- for the edit action, in the column with the external ID of the touchpoint where the customer was last changed.
How to subscribe customers to a brand
On a multi-brand account, the integration point’s brand sets the brand of the customer’s subscription. The subscription is passed through the global subscription, channel subscription, and topic subscription columns. To subscribe customers to several brands at once, run the import again for each brand.1
Find your brand's integration point
Go to the Integrations section.
2
Pick the integration point for the import
Filter by brand and pick an integration point. For example, to subscribe customers to the Demo brand’s campaigns, use that brand’s website integration point.
3
Select that integration point in Step 4. Configure the import
Add to a segment
Pick a static segment. If there’s no suitable one yet, create a new one.Use a different time
There’s no separate time setting. To set the time, add these columns to the file:- for the source action, the date the customer entered the database, in UTC;
- for the edit action, the date the customer was last updated, in UTC.
Step 5. Review and start the import
Before you start, Maestra Platform shows the first rows of the file with the mapping already applied. Check that the data looks the way you expect — that the right values landed in the right fields. If everything’s correct, click Start import.How to track the import
Once started, the import appears in the list on the Import page. For each task you’ll see:- start date,
- import type,
- source file with its comment,
- load progress,
- rows imported and errors,
- who started it.